Containers have become the standard way to develop and deploy applications these days with Docker and Kubernetes dominating the field. This is especially true in machine learning and for a very good reason! Containers provide flexibility to experiment with different frameworks, versions, GPU's with minimal overhead. Besides, they eliminate discrepancies between the development and the production environment, they are lightweight compared to virtual machines, and they can easily be scaled up or down.
In this article, we will containerize our Deep Learning application using Docker. Our application consists of a Tensorflow model that performs image segmentation, Flask, uWSGI for serving purposes, and Nginx for load balancing. For those who haven't followed this article series, I suggest having a look at the previous articles.
For this purpose,we will build a Docker image that packages our Deep Learning/Flask code, an image for Nginx and we will combine them using Docker Compose. I’m sure that some don’t entirely understand what this means, so I hope to make it crystal clear through this article.
If all that sounds interesting to you, hope in. Remember that our ultimate goal is to deploy our model into the cloud and scale it to millions of users.
What is a Container?
A container is a standard unit of software that packages the code and all its dependencies so that the application runs quickly and reliably from one computing environment to another.

This simply means that we can run the exact same software in any environment regardless of the operating system and hardware.
As you might have guessed, it immediately solves problems such as missing dependencies, enables easy collaboration between developers, and provides isolation from other applications.
And of course, it eliminate a statements that origins from the beginning of time:
“It works on my machine, I don’t understand why it doesn’t work here.”
Containers also run on top of the operating system’s kernel and they don't “replicate” the Operating system as Virtual machines do, and therefore are far more lightweight and portable.
What is Docker?
Docker has become so incredibly popular over the past years that it essentially became synonymous with containers. These two terms have been used indistinguishably. I was tempted to mention a few other options but honestly, there is no point at this time.
Docker is an open-source platform as a service for building, deploying, managing containerized applications.
Moreover, it comes with a very powerful Command Line Interface (CLI), a desktop User Interface (UI) for those that prefer a visual approach (Docker Desktop), as well as a collection of thousands of ready to use container images (Docker Hub).
OK let's start using Docker in our example. It is easier to explore more of its advantages along the process.
How to set up Docker?
The first thing we need to do is install the docker engine on our machine. Because it is more than a simple “apt-get install” command and because I won’t do as good of a job as the official Docker documentation, I will prompt you to go there and come back once you finish the installation (make sure to follow all the steps).
Don't worry I'll wait.
Done? Ok, let’s move on.
If everything went well you should be able to execute the following command on a terminal and start a sample container:
$ docker run ubuntu
Here, “ubuntu” is a container image that includes a minimal ubuntu installation. With “docker run IMAGE”, we can spin up the container.
A docker image is nothing more than a template that contains a set of instructions for creating a container. It includes the elements needed to run the application as a container such as code, config files, environment variables, libraries. If the image is deployed to a Docker environment it can then be executed as a Docker container.
If we’d like to enter the container, we can run the exact same command with an “–it” argument.
$ docker run -it ubuntu
Once we've done that, a bash terminal that gives us access to the container appears. Here we can do whatever the heck we want. We can install things, execute software, and almost everything we do in a normal system. To exit the terminal, just type “exit”.
root@5bb91d6c145d:/# lsbin boot dev etc home lib lib32 lib64 libx32 media mnt opt proc root run sbin srv sys tmp usr varroot@5bb91d6c145d:/#
To inspect all running containers, we have the “docker ps” command:
$ docker ps# CONTAINER ID IMAGE COMMAND CREATED STATUS PORTS NAMES# 5bb91d6c145d ubuntu "/bin/bash" 4 minutes ago Up 4 minutes friendly_cray
The same container can be pulled from another environment or system and it will have the exact same software and dependencies.
OK, what’s next?
How to build a deep learning docker image?
Enough fooling around. It's time to build our Tensorflow/Flask/uWSGI image that contains our Unet model.

But before that, we need to know what dependencies are necessary to include in the image.
If you follow along with the series and develop the whole app inside a virtual environment with only the essentials libraries, we can do:
$ pip freeze > requirements.txt
This command will take all of our installed libraries inside the virtual environment and write them in a requirements.txt file alongside their versions. A few handpicked libraries inside the file are:
Flask==1.1.2uWSGI==2.0.18Tensorflow==2.2.0
Tip: An important detail to know here is that we probably don't need to declare all these libraries because most of them are dependencies of other libraries. If I had to guess I'd say that including only those three, would be sufficient but don't take my word for granted.
And in fact, we won't even need Tensorflow because we will use an existing Tensorflow image from Docker Hub that already contains it. More on that in a while.
The next step is to restructure our application so that all the necessary code needed to run an inference lives inside a single folder. This is due to the fact that we can’t have the docker container reads from multiple folders and modules. Let's remind ourselves of our application first.
We have the Flask app written in Python here:
import osimport tracebackfrom flask import Flask, jsonify, requestfrom unet_inferrer import UnetInferrerapp = Flask(__name__)APP_ROOT = os.getenv('APP_ROOT', '/infer')HOST = "0.0.0.0"PORT_NUMBER = int(os.getenv('PORT_NUMBER', 8080))u_net = UnetInferrer()@app.route(APP_ROOT, methods=["POST"])def infer():data = request.jsonimage = data['image']return u_net.infer(image)
Apart from an inferrer class, I don’t see any other dependencies so let’s include that one as well.
import tensorflow as tfclass UnetInferrer:def __init__(self):self.image_size = 128self.saved_path = 'unet'self.model = tf.saved_model.load(self.saved_path)self.predict = self.model.signatures["serving_default"]def preprocess(self, image):image = tf.image.resize(image, (self.image_size, self.image_size))return tf.cast(image, tf.float32) / 255.0def infer(self, image=None):tensor_image = tf.convert_to_tensor(image, dtype=tf.float32)tensor_image = self.preprocess(tensor_image)shape= tensor_image.shapetensor_image = tf.reshape(tensor_image,[1, shape[0],shape[1], shape[2]])pred = self.predict(tensor_image)['conv2d_transpose_4']pred = pred.numpy().tolist()return {'segmentation_output':pred}
Again, besides Tensorflow I can't see any other dependency, so I guess we're done here.
Oh oh wait a moment, I forgot the saved model.
We should of course include all the trained variables inside the folder as well. And I forgot something else too. The uWSGI config file. So we have our trained Tensorflow model, our Flask application, our uWSGI configuration, and the requirements.txt file. Now we’re all set and our folder structure looks like this:
app/unet/app.inirequirements.txtservice.pyunet_inferrer.py
Now that we have our “app” folder, it is time to write our Dockerfile.
Dockerfiles are contracts that provide all the necessary steps Docker needs to take during building an image.
They can vary from having 5 lines of simple commands to hundreds. The great thing about Dockerfiles is that Docker won’t execute the whole thing every time. Once the image is built, on any subsequent execution it will run only the commands below the line that changed. Therefore we can experiment with different libraries and don't have to wait every time for the entire image to been built.
So let’s open an empty text file and start building our Dockerfile.
Every docker image should be built on top of another image. This can be a very primitive one such as "ubuntu” with only the OS kernel and basic libraries or a high-level one like “TensorFlow” which is the one we will use today.
FROM tensorflow/tensorflow:2.0.0
Tensorflow provides a variety of images for different versions and different environments (CPU vs GPU). “TensorFlow” is the name of the image while “2.0.0” is the tag. Tags are used to differentiate images from the same vendor.
Alternatively, we could use a basic Linux image and install all of our dependencies ourselves, but most of the time this is not preferred because the official images are highly optimized in terms of memory consumption and build time
WORKDIR /app
The WORKDIR line sets the working directory inside the container into the /app folder so that any commands or code executions will happen there. And of course, we need to copy our local folder inside the container which we can do like this:
ADD . /app
All of our files are now present inside the container so we should be able to install all the required Python libraries.
RUN pip install -r requirements.txt
Did you notice that we haven’t installed Python so far? The reason behind that is that the “TensorFlow” image contains Python3, pip, and other necessary libraries. To have a peek inside the image, you can visit the Docker Hub website.
Finally, as everything is in place, we can initiate the uWSGI server with the CMD command. The CMD command will not be invoked during building time but during runtime.
CMD ["uwsgi", "app.ini"]
Writing Dockerfiles is not always as straightforward as you may imagine. For more advanced usage, I would recommend spending some time going through the documentation.
If we haven't missed anything, we can now jump back to the terminal, build the image and instruct Docker to execute all these steps in order. I will name the image “deep-learning-production" and give it a “1.0” tag to differentiate it from future versions.
$ docker build -t deep-learning-production:1.0 .
Be aware that this may take a while because the TensorFlow image is quite big, so we have to be patient. If everything went fine you should see
Successfully built SOME_RANDOM_IDSuccessfully tagged deep-learning-production:1.0
How to run a deep learning docker container?
It's finally time to run our container and fire up our server inside of it
$ docker run --publish 80:8080 --name dlp deep-learning-production:1.0
Two things to notice here:
The “publish” argument will expose the 8080 port of the container to the 80 port of our local system. Basically, each request coming to localhost:80 will be routed to the 8080 inside the container. And remember that 8080 is the uWSGI listening port.
A good practice is also to specify a name when running a container. Otherwise, we need to use the random ID by Docker to refer to the container and this can be quite cumbersome.
If the container was executed successfully we will see logs of spawned uWSGI workers and we can test it by running the client script we build in the previous article and send an image to the server for inference.
Is everything working perfectly? I'm sure it does.
Sum up
So instead of running the server locally, we have developed a container that:
includes all the necessary dependencies,
is fully isolated from the rest of our system,
can be moved intact to another machine, or deployed in the cloud.
I hope that by now you see the flexibility and the simplicity containers provide.

To transport the container to another machine, we can either push the container to the Docker registry so that other people can pull from it or we can simply pass the Dockerfile and let the other developer build the image. And we can be sure that everything will be 100% the same.
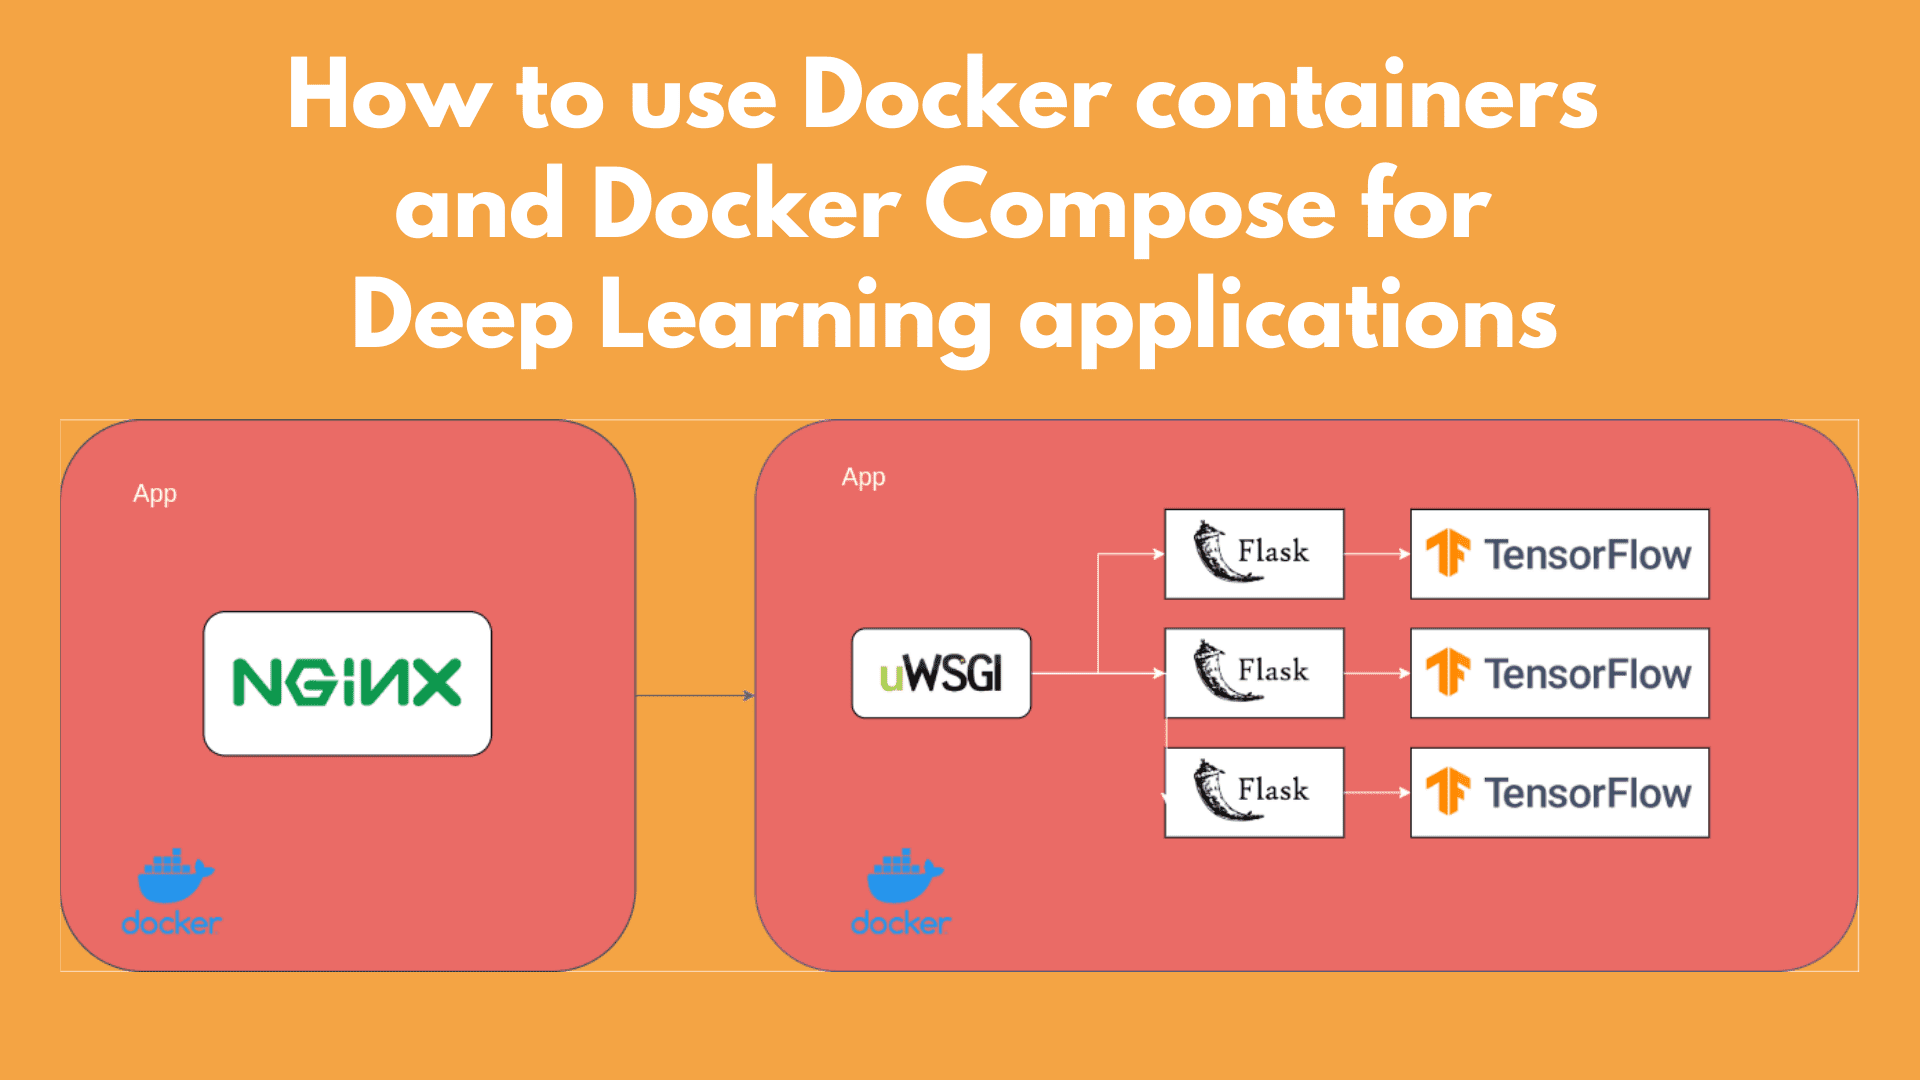
How to set up an Nginx container?
Following the same principles, we can build the Nginx container which will act in front of the uWSGI server as a reverse proxy. Again we have to move all the files inside a folder ( in this case it is only the Nginx config), construct the Dockerfile, build and run the image.
The Nginx config (nginx.conf) has the below structure (more details in the previous article):
server {listen 80;location / {include uwsgi_params;uwsgi_pass app:660 ;}
The config essentially tells us that the Nginx server will listen on port 80 and route all the outside requests coming there to the uWSGI server (app) in port 660 via the uwsgi protocol.
Remember that in the uWSGI config file (app.ini), we have to change the listening port from the HTTP port 8080 to be a socket port (660) to make it work with Nginx.
[uwsgi]module = servicesocket= :660callable = appdie-on-term = trueprocesses = 1master = falsevacuum = true
The Nginx Dockerfile will be quite simple because it does only two things. It pulls the original Nginx image and it replaces the default configuration file with our custom one:
FROM nginxRUN rm /etc/nginx/conf.d/default.confCOPY nginx.conf /etc/nginx/conf.d/
And that's it. This time there is no point to run the container alone because it doesn't do anything. Instead, we will have to combine those two containers into a single system so they can run simultaneously.
Which brings us to the last part: Docker Compose.
How to define and run multi-container Docker applications using Docker Compose?
Docker compose is a tool for running multiple containers as a single service.
You might be wondering why we need to have multiple containers? Can’t we run everything on a single container? For example, wouldn’t it be nice to have both Nginx and uWSGI inside the same container?
The answer is no! Because we would lose the ability to have many uWSGI instances but only one Nginx instance. Plus the container would become enormous.
Imagine the use case where our application consists of a database, a backend, frontend, messaging systems, task queues. We can’t possibly run everything into a single container. This is where Docker Compose comes into play.

From the developer’s perspective, Docker compose is nothing more than a configuration file in which we define all the containers and how they interact with each other.
We can transfer our entire service to another machine by simply moving the Dockerfiles and the docker compose file and build it.
Before we begin, we need to install Docker Compose. Again, it’s best to follow the instructions in the original docs.
To define the configuration, we create a “docker-compose.yml” file that declares our two containers and the network interactions.
version : "3.7"services:app:build: ./appcontainer_name: deep-learning-productionrestart: alwaysexpose:- 660nginx:build: ./nginxcontainer_name: nginxrestart: alwaysports:- "80:80"
The first thing we need to set up is the docker compose version and the main services. Here we have an app service containing the Tensorflow model and the uWSGI server, and the Nginx service.
Each service has a “build” parameter that declares the relative folder path that the service lives and instructs Docker to look it up there when building the image. They also have a custom container name which will be the reference name that other services will use to define interaction with it. For example, the nginx config has the following line:
uwsgi_pass app:660
which matches the name of the uWSGI service declared in the yaml file.
We also need to restart the service each time the container exits due to failure, to make sure that the services are always up, and finally, we need to define our ports (which honestly is the most important part here).
The uWSGI service has to open the 660 port to listen for requests from the Nginx server. If you remember, we defined the exact same socket port inside our app.ini file. Note that the port will be opened inside Docker and it will not be exposed in the outer world.
The Nginx service has to open the 80 port to the external world and map all requests coming there to the 80 port of the container. The first 80 port is chosen randomly but the second 80 port is the listening port declared in the Nginx config
server {listen 80;...
So the flow here is as follows: ]
Requests from the outer world are coming to the 80 port of our environment,
they mapped to the Nginx container’s 80 port
they routed to the uWSGI 660 port,
uWSGI calls the Flask endpoint and executes the Tensorflow inference.
uWSGIsend back the response throughout the same pipeline.
We can finally build the Docker network with both services using
$ docker-compose build
and start the docker containers with
$ docker-compose up
The moment of truth is here. Let’s try to hit our network using our client (and make sure that we are using the correct ports).
We’re running the script with and wait...
python client.py
Did it work? It worked on my laptop !! Everything seems to work perfectly and I got back the segmentation mask of a Yorkshire terrier. Awesomeeeeeeeee!!!

Note that you can find the entire code in our Github repository (including code from the previous articles)
As a side material, there is an excellent course on Cloud computing offered by the University of Illinois: Cloud Computing Specialization: Cloud Computing Applications, Part 1: Cloud Systems and Infrastructure
What’s next?
I have to admit that the last couple of articles were quite technical and we dove into many details somewhat unrelated to machine learning. But this is just part of being a machine learning engineer. Sometimes we will have to deal with stuff like this if we want our models to be used in the real world.
Let's appreciate what we have accomplished so far.
We transformed our deep learning model into a web application using Flask
We served the application with uWSGI
We hid it behind an Nginx reverse proxy for load balancing and security
We containerized both services using Docker and Docker Compose
We finally executed the entire system locally.
So what is the next step? Obviously, we want to make the application visible to the world. And to do that we will have to deploy it in the cloud and expose it to the web. Therefore, in the next articles, we'll see how to deploy and serve the application in Google cloud and how to use Kubernetes to orchestrate the containers, monitor them, and scale them up to serve millions of users.
Tchau...
References
- digitalocean.com, How To Install and Use Docker on Ubuntu 18.04
- docs.docker.com, Docker documentation
- docs.docker.com/compose, Docker compose
- infoworld.com, What is Docker?
- tutorialspoint.com, Docker - Compose

* Disclosure: Please note that some of the links above might be affiliate links, and at no additional cost to you, we will earn a commission if you decide to make a purchase after clicking through.