Why should I care about Kubernetes? I don’t want to be a DevOps Engineer. I am just interested in Machine Learning and building models. I’m sure that many folks have this thought in their minds. While this is partially true, I believe that having a basic understanding of Infrastructure and DevOps is a must for many practitioners. Why?
Because models are useless unless they are deployed into production. And even this is not enough. We then have to maintain it. We need to care about things such as scalability, A/B testing, retraining. MLOps is an ongoing effort to find a standardized solution and solve all of them. Kubernetes seems to be the common denominator for many of those solutions and that’s why I think it would be beneficial for many to write this article.
Here we will explore:
What is Kubernetes?
The basic principles behind it
Why it might be the best option to deploy Machine Learning applications and
What features it provides to help us maintain and scale our infrastructure.
How to set up a simple Kubernetes cluster in Google cloud
As far as Google cloud concerns, it is an obvious choice because Kubernetes is partially built from a Google team and Google Kubernetes Engine (GKE) is highly coupled with it (more on GKE later).
What is Kubernetes?
In a previous article, we discussed what containers are and what advantages they provide over classic methods such as Virtual Machines (VMs). To sum it up, containers give us isolation, portability, easy experimentation, and consistency over different environments. Plus they are far more lightweight than VMs. If you are convinced about using containers and Docker, Kubernetes will come as a natural choice.
Kubernetes is a container orchestration system that automates deployment, scaling, and management of containerized applications.
In other words, it helps us handle multiple containers with the same or different applications using declarative configurations (config files).
Because of my Greek origin, I couldn't hold myself from telling you that Kubernetes means helmsman or captain in Greek. It is the person/system that controls the whole ship and makes sure that everything is working as expected.
Why use Kubernetes
But why use Kubernetes at all?
It manages the entire container’s lifecycle from creation to deletion
It provides a high level of abstraction using configuration files
It maximizes hardware utilization
It's an Infrastructure as a Code (IaaC) framework, which means that everything is an API call whether it’s scaling containers or provisioning a load balancer
Despite the high-level abstractions it provides, it also comes with some very important features that we use in our everyday ML DevOps life:
Scheduling: it decides where and when containers should run
Lifecycle and health: it ensures that all containers are up all time and it spins up new ones when an old container dies
Scaling: it provides an easy way to scale containers up or down, manually or automatically (autoscaling)
Load balancing
Logging and monitoring systems
If you aren’t sure we need all of them, make sure to check the previous article of the series where we go through a journey to scale a machine learning application from 1 to millions users.
Honestly, the trickiest part about Kubernetes is its naming of different components. Once you get a grasp of it, everything will just click in your mind. In fact, it’s not that different from our standard software systems.
Kubernetes fundamentals
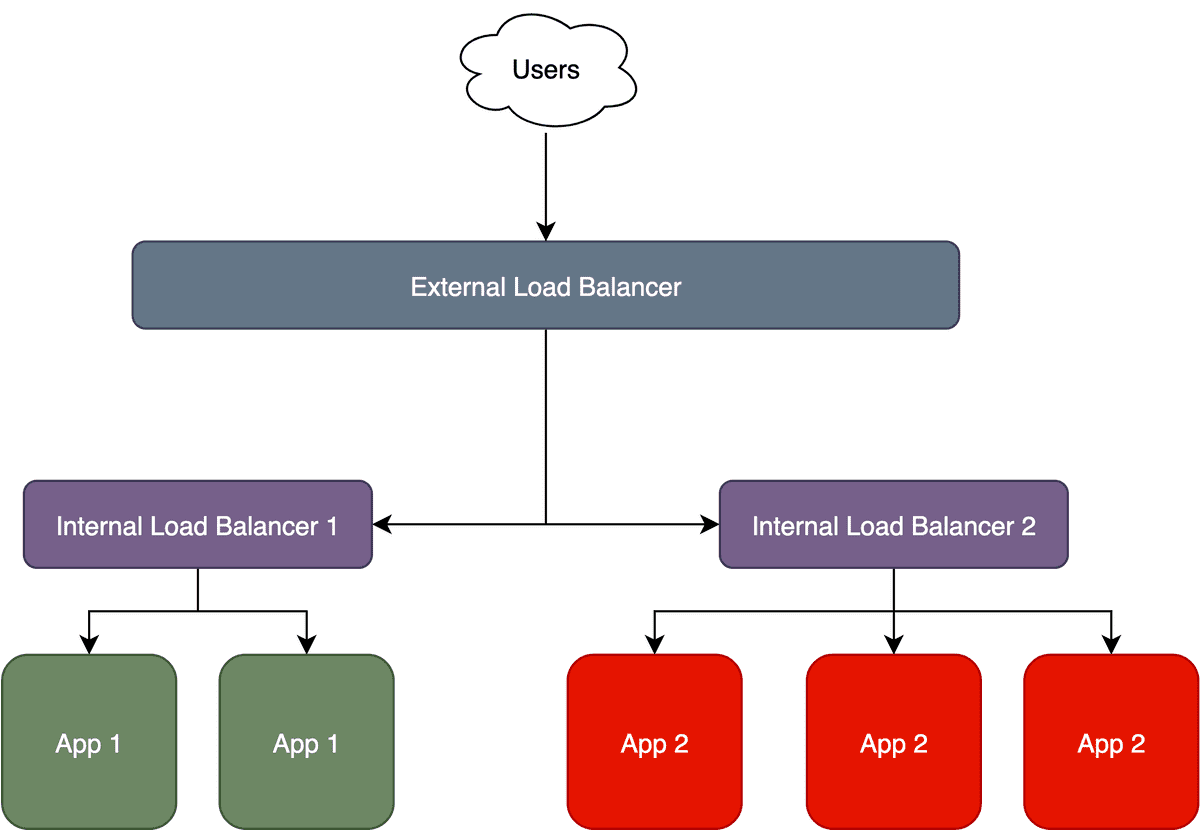
In modern web applications, we usually have a server that is exposed to the web and is been hit by different clients. Traditionally, a server is either a physical machine or a VM instance. When we have increased traffic, we add another instance of the server and manage the load using a load balancer. But we might also have many servers hosting different applications in the same system. Then we need an external load balancer to route the requests to the different internal load balancers, which will finally send it to the correct instance, as illustrated below:
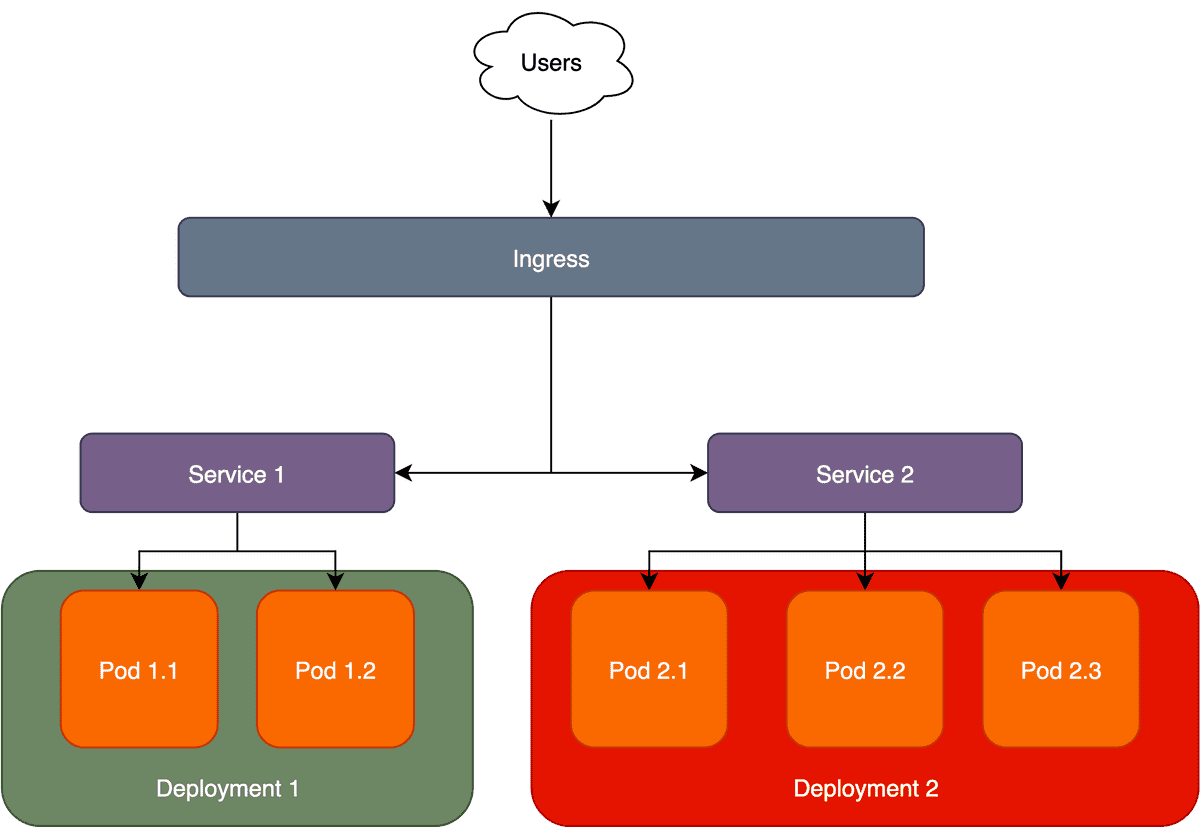
Kubernetes does the exact same thing but calls everything with different names. The internal load balancer is called a Service and the external load balancer is called Ingress. The different apps are the Deployments while the application containers are called Pods.
A node is a physical or virtual machine that runs many pods (aka containers) and a cluster is simply a collection of nodes. And to get things more confusing, we can either have a physical cluster or a virtual cluster (this is called namespace) that runs multiple clusters.
I know there are too many new terms but things are quite simple actually if you keep in mind the mapping of the different definitions I just mentioned.
| Without Kubernetes | With Kubernetes |
|---|---|
| Containers | Pod |
| Internal Load Balancer | Service |
| External Load Balancer | Ingress |
| Application | Deployment |
| Physical Machine | Node |
| Cluster of Machines | Cluster |
| Virtual Cluster | Namespace |
Let's see how things work in practice to hopefully make more sense of it. To do that we will deploy our containerized application in Google cloud using the Google Kubernetes Engine (GKE). For those who are new to the series, our application consists of a Tensorflow model that performs image segmentation. Don’t forget that we already built a Docker image so everything is in place to get started.
What is Google Kubernetes Engine(GKE): fundamentals and installation
Google Kubernetes Engine (GKE) is a Google cloud service that provides an environment and APIs to manage Kubernetes applications deployed in Google's infrastructure. Conceptually it is similar to what Compute Engine is for VMs. In fact, GKE runs on top of Compute Engine instances but that's another story.
The first thing we need to take care of is how we interact with the Google cloud and GKE. We have three options here:
Use Google cloud’s UI directly (Google cloud console)
Use Google's integrated terminal known as cloud shell
Or handle everything from our local terminal.
For educational purposes, I will go with the third option. To configure our local terminal to interact with Kubernetes and GKE, we need to install two tools: Google cloud SDK (gcloud) and the Kubernetes CLI (kubectl).
Remember that in Kubernetes everything is an API call? Well, we can use those two tools to do pretty much everything.
We want to create a cluster? We can. Increase the number of pods? See the logs? You betcha.
To install gcloud, one can follow the exceptional official documentation. For kubectl, the official Kube docs are quite good as well. Both of them shouldn't take that long as they are only a couple of commands.
GKE can be managed inside a Google cloud project so we can either create a new one or use an existing one.
And now for the good stuff.
How to deploy a machine learning application in Google cloud with Google Kubernetes Engine?
First, we want to create a new cluster.e can do that simply by running:
$ gcloud container clusters create CLUSTER_NAME --num-nodes=1
Yes, it's that easy. Verify that the cluster is created correctly using the Google Cloud Console. We should see something like this:
Note that I chose to use only one node in this cluster to keep things simple.
The next thing is to configure kubectl to work with GKE and the cluster we just created. If we initialized gcloud correctly, we should be good to go by running:
$ gcloud container clusters get-credentials CLUSTER_NAME
After that, every kubectl command will be automatically mapped to our GKE cluster. Our cluster and nodes are initialized and waiting for our application to be deployed.
Kubernetes defines Deployment as a specific term that represents an object that manages an application typically by running pods. So to deploy any application we need to create a Deployment. Each deployment is associated with a Docker image.
In GKE’s case, the Docker image needs to be placed in the Google containers registry (Google’s repository of docker images) so that GKE can pull it and build the container.
To push an image in the container’s registry:
$ HOSTNAME = gcr.io$ PROJECT_ID = deep-learning-production$ IMAGE = dlp$ TAG= 0.1$ SOURCE_IMAGE = deep-learning-in-production$ docker tag ${IMAGE} $ HOSTNAME /${PROJECT_ID}/${IMAGE}:${TAG}$ docker push $ HOSTNAME /${PROJECT_ID}/${IMAGE}:${TAG}
The above commands will simply transfer the Dockerfile for the local image “deep-learning-in-production" and all the necessary files to the remote registry. To make sure that it’s been pushed, check out the upload images using:
$ gcloud container images list-tags [HOSTNAME]/[PROJECT_ID]/[IMAGE]
Once the image is uploaded, we can build the container by:
$ gcloud builds submit --tag gcr.io/deep-learning-in-production/app .
Creating a Deployment
Following that we can now create a new Kubernetes Deployment. We can either do this with a simple kubectl command
$ kubectl create deployment deep-learning-production --image=gcr.io/dlp-project/deep-learning-in-production 1.0
or we can create a new configuration file (deployments.yaml) to be more precise with our options.
apiVersion: apps/v1kind: Deploymentmetadata:name: deep-learning-productionspec:replicas: 3selector:matchLabels:app: dlptemplate:metadata:labels:app: dlpspec:containers:- name: dlpimage: gcr.io/$PROJECT_ID/$IMAGEports:- containerPort: 8080env:- name: PORTvalue: "8080"
What did we define here? In a few words, the above file tells Kubernetes that it needs to create a Deployment object named “deep-learning-production" with three distinct pods (replicas). The pods will contain our previously built image and will expose the 8080 port to receive external traffic. For more details on how to structure the yaml file, advise the kubernetes docs.
Isn't it great that we can do all of these using a simple config file? No ssh into the instance, no installing a bunch of libraries, no searching the UI for the correct button. Just a small config file.
By apply the deployments.yaml config as shown below, the deployment will automatically be created:
$ kubectl apply -f deployment.yaml
We can now track our deployment with kubectl:
$ kubectl get deployments
which will list all available deployments
NAME READY UP-TO-DATE AVAILABLE AGEdeep-learning-production 1/1 1 1 40s
Same for the pods
$ kubectl get pods
As we can see all 3 pods are up and running
NAME READY STATUS RESTARTS AGEdeep-learning-production-57c495f96c-lblrk 1/1 Running 0 40sdeep-learning-production-57c495f96c-sdfui 1/1 Running 0 40sdeep-learning-production-57c495f96c-plgio 1/1 Running 0 40s
Creating a Service/load balancer
Due to the fact that we have many pods running, we should have a load balancer in front of them. Again, Kubernetes calls internal load balancer Services. Services provide a single point of access to a set of pods and they should always be used because pods are ephemeral and can be restarted without any warning. To create a Service, a configuration file is again all we need.
apiVersion: v1kind: Servicemetadata:name: deep-learning-production-servicespec:type: LoadBalancerselector:app: deep-learning-productionports:- port: 80targetPort: 8080
As you can see, we define a new Service of type load balancer which targets pods (the selector field) with the name “deep-learning-production”. It also exposes the 80 port and maps it to the 8080 target port of our pods ( which we defined before in the deployment.yaml file)
We apply the config
$ kubectl apply -f service.yml
and we get the status of our service:
$ kubectl get services
As you can observe below, the “deep-learning-production" service has been created and is exposed in an external IP through the predefined port. Note that the Kubernetes service is the external service run by Kubernetes itself and it’s something we won’t deal with.
NAME TYPE CLUSTER-IP EXTERNAL-IP PORT(S) AGEdeep-learning-production LoadBalancer 10.39.243.226 34.77.224.151 80:30159/TCP 75skubernetes ClusterIP 10.39.240.1 <none> 443/TCP 35m
If we hit this API with a client, we should get back a response from one of the pods containing the Tensorflow model. And in case you didn’t notice it, we just deployed our scalable application into the cloud.
Putting it all together
To sum up, all we need to do to deploy an app is:
Create a cluster of machines to run it
Set up a Kubernetes Deployment
Set up a Service
The above 3 steps will handle the creation of pods and all the networking between the different components and the external world.
Now you may wonder: were all the above necessary? Couldn’t we create a VM instance and push the container there? Wouldn’t it be much simpler?
Maybe it would, to be honest.
But the reason we chose Kubernetes is what comes after the deployment of our app. Let's have a look around and see what goodies Kubernetes give us and how it can help us grow the application as more and more users are joining. And most importantly: Why it’s especially useful for machine learning applications?
Why use Kubernetes (again)?
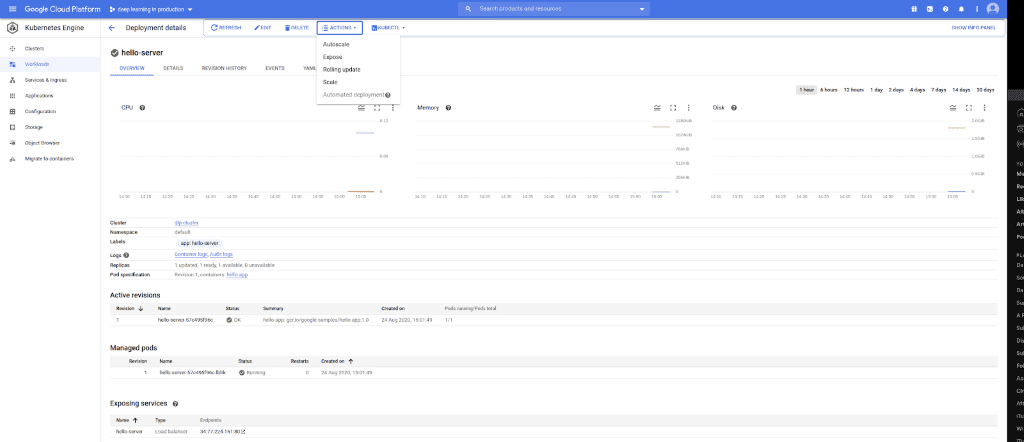
In this section, I will use a more visual approach. We will explore Google Kubernetes Engine’s UI in order to discover some of the functionalities it provides. Here is what the inside of GKE looks like.
You may have to squint a little but you can see that it gives us an easy way to manage everything. We can directly see all of our services, our pods, the number of replicas as well as some nice visualizations about CPU, memory, and disk utilization. That way we can be aware of our app’s performance at every time. But that's not all. Let's zoom in a little.
In the dropdown menu, there are some actions that are available regarding our Kubernetes setup.
Scaling the application
Starting from the bottom, we can manually scale the number of pods inside the deployment. For example: If we observe a big spike in the number of requests, we can increase the replicas of pods. As a result, the application’s response time will gradually start to decline again. Of course, we can accomplish that from the terminal as well. So we effortlessly almost solve a major problem right here: Scalability. As we grow, we can add more and more replicas hidden behind the service, which will handle all the load balancing and routing stuff.
$ kubectl scale deployment DEPLOYMENT_NAME --replicas 4
You might also have noticed that there is an autoscale button. That's right. Kubernetes and GKE let us define autoscaling behavior a priori. We can instruct GKE to track a few metrics such as response time or request rate, and then increase the number of pods when they pass a predefined threshold. Kubernetes supports two kinds of auto-scaling:
Horizontal Pod Autoscaling (HPA), and
Vertical Pod Autoscaling (VPA).
HPA creates new replicas to scale the application. In the below example, HPA targets Cpu utilization and autoscales when it becomes larger than 50%. Note that we need to define a minimum and a maximum number of replicas to keep things under control.
$ kubectl autoscale deployment DEPLOYMENT_NAME --cpu-percent=50 --min=1 --max=10
Or we can modify the deployment.yaml accordingly. To track our HPA:
$ kubectl autoscale deployment DEPLOYMENT_NAME --cpu-percent=50 --min=1 --max=10
NAME REFERENCE TARGETS MINPODS MAXPODS REPLICAS AGEdlp Deployment/dlp 0%/50% 1 10 3 61s
In a similar manner, we can configure VPA.
In my experience though, HPA should be preferred most of the time, because scaling out is usually better than scaling up.
With HPA, we managed to even eliminate the need for a human presence at all times and we can sleep better at night.
Updating the application (with a new Deep Learning model)
When we want to update our application with a new Docker image (perhaps to use a new model, or a retrained one), we can perform a rolling update. A rolling update means that Kubernetes will gradually replace all the running pods, 1 by 1, with the new version. At the same time, it ensures that there will be no downfall in the performance. In the below example, we replace the docker image with a newer version.
$ kubectl set image deployment dlp dlp_image=dlp_image:2.0
Monitoring the application
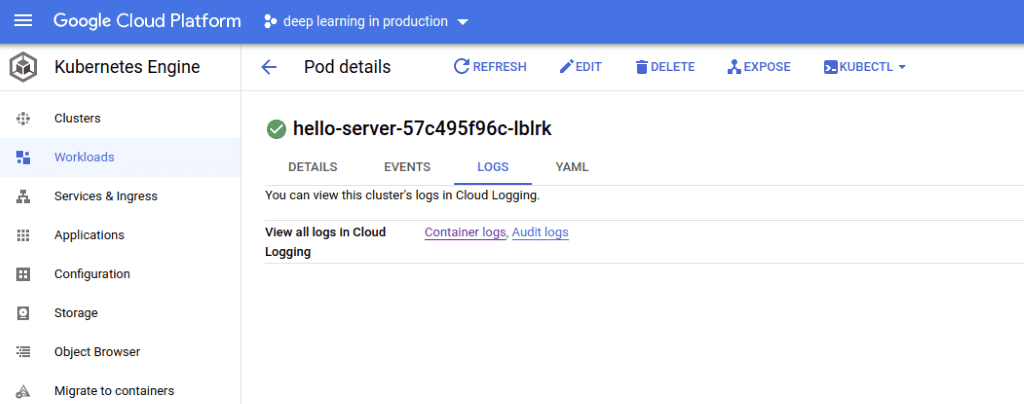
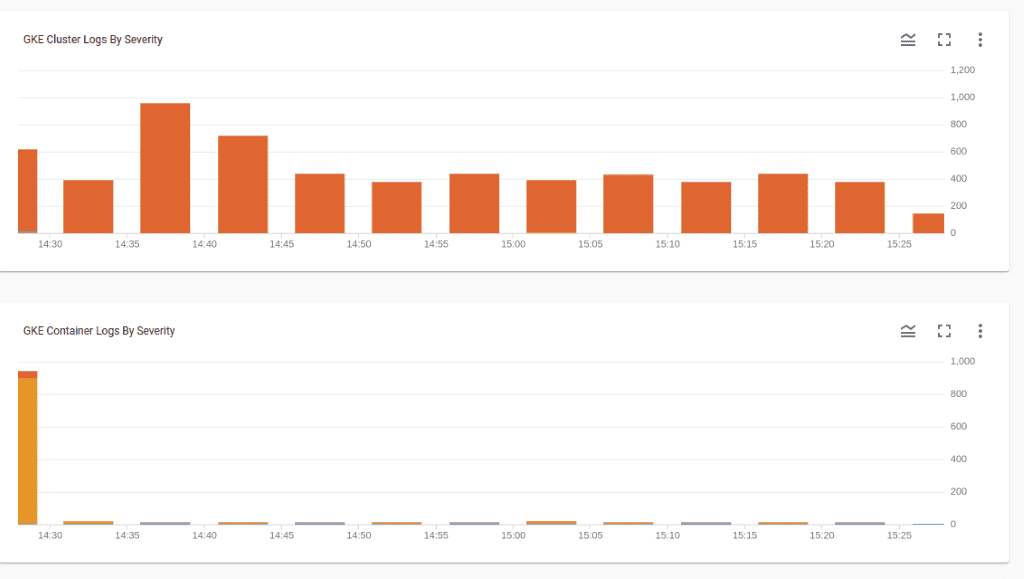
In order to optimize our infrastructure and keep track of the model's accuracy, we also need to have some form of monitoring and logging. GKE has been automatically configured with Google Clouds monitoring system. So we can easily access all the logs.
If we click on the container logs inside a specific pod, we can navigate to the GCS’s “Cloud logging” service and debug our app for errors.
Moreover, we have access to some pretty cool visualizations and charts, to help us monitor things better.
Running a (training) job
Running jobs is another integral part of modern applications. In the case of machine learning, the most common example is a training job where we train (or retrain) our model in the cloud on a set of data. Again, with Kubernetes, it becomes just another yaml file.
apiVersion: batch/v1kind: Jobmetadata:name: train-jobspec:template:metadata:name: train-jobspec:containers:- name: train-dlpimage: training_imagecommand: ["python"]args: ["train.py", "-model", "unet", "-data", "gs://deep-learning-in-prodiction-training-data/oxford_iiit_pet/"]restartPolicy: NeverbackoffLimit: 4
Once we apply the config file, Kubernetes will spin up the necessary pods and run the training job. We can even configure things such as parallelism of multiple jobs and the number of retries after failures. More details on how to run jobs, you can find on the docs
Note: In general GKE docs are very well written and you can find anything there!
Using Kubernetes with GPUs
Deep learning without GPUs is like ice cream with low-fat milk (decent but not awesome). To use Kubernetes with GPU's, all we have to do is :
Create nodes equipped with NVIDIA GPUs
Install the necessary drivers
Install the Cuda library and that's it.
Everything else will stay exactly the same. Adding GPUs to an existing cluster is a little trickier than creating a new one but again the official documentation has everything we need.
Model A/B Testing
Another common deep learning specific use case is model A/B testing in terms of running multiple versions of the same model simultaneously. By doing that we can keep track of which one performs better and keep only the best models in production. There are multiple ways to accomplish that using Kubernetes.
Here is what I would do:
I would create a separate Service and Deployment to host the second version of the model and I would hide both services behind an external load balancer (or an Ingress as Kubernetes calls it).
The first part is pretty straightforward and it's exactly what we did before. The second part is slightly more difficult. I won't go into many details about Ingress because it's not a very easy concept to understand. But let’s discuss a few things.
In essence, an Ingress object defines a set of rules for routing HTTP traffic inside a cluster. An Ingress object is associated with one or more Service objects, with each one associated with a set of Pods. Under the hood is effectively a load balancer, with all the standard load balancing features (single point of entrance, authentication, and well... load balancing)
To create an Ingress object, we should build a new config file with a structure as the one that follows:
apiVersion: networking.k8s.io/v1kind: Ingressmetadata:name: dlp-ingressspec:rules:- http:paths:- path: /model1backend:serviceName: model1servicePort: 8080- path: /model2backend:serviceName: model2servicePort: 8081
The Ingress load balancer will route the requests on the different services based on the path of the request. All requests coming in the /model1 endpoint will be served by the first service and all requests on /model2 by the second service (FYI this is called Fanout in engineering terms).
Now let’s look at the client side. There, I would send each request randomly to a different path. This can be achieved by a simple random number generator. We can of course build a more complex logic according to our needs.
Wrapping up
Ok, I think I'm going to end this now because we covered a lot of stuff. But be certain that I could keep going on and on by finding new machine learning use cases and explore whether Kubernetes would be able to solve them. In the majority, I'm positive that we could find a decent solution.
This whole article may sound like a Kubernetes advertisement but my true purpose is to motivate you to try it out and to give you a rough overview of its features and capabilities. Note that some of them are tightly coupled with Google cloud but in most cases, they apply to any cloud provider.
A final conclusion is that deploying an application (even if it's a Deep learning model) is not something fundamentally hard. The hardest part comes afterwards when we need to maintain it, scale it, and add new features to it. Fortunately, nowadays there are plenty of sophisticated tools to help us along the process and make our lives easier. As a mental exercise, try and imagine how you would do all of them ten years ago.
In case you haven't realized by now, this entire article-series is an effort to look outside the machine learning bubble and all the cool algorithms that come with it. It is essential that we understand the external systems and infrastructure required to run them and make them available to the public.
If you have found the articles useful so far, don't forget to subscribe to our newsletter because we have a lot more to cover. AI Summer will continue to provide original educational content around Machine Learning.
And we have a few more surprises coming up for all of you who want to learn AI, so stay tuned...
References
Coding Tech : Should You Use Kubernetes and Docker In Your Next Project?
autho0.com : Kubernetes Tutorial - Step by Step Introduction to Basic Concepts
containerjournal.com : Efficient MLOps in a Kubernetes Environment
* Disclosure: Please note that some of the links above might be affiliate links, and at no additional cost to you, we will earn a commission if you decide to make a purchase after clicking through.
