Hello hello hello and welcome to the Deep Learning in Production course.
In this article series, our goal is dead simple. We are gonna start with a colab notebook containing prototype deep learning code (i.e. a research project) and we’re gonna deploy and scale it to serve millions or billions (ok maybe I’m overexcited) of users.
We will incrementally explore the following concepts and ideas:
how to structure and develop production-ready machine learning code,
how to optimize the model’s performance and memory requirements, and
how to make it available to the public by setting up a small server on the cloud.
But that’s not all of it. Afterwards, we need to scale our server to be able to handle the traffic as the userbase grows and grows.
So be prepared for some serious software engineering from the scope of machine learning. Actually now I’m thinking about it, a more suitable title for this series would be “Deep Learning and Software Engineering”.
To clarify why Software Engineering is an undeniable significant part in deep learning, take for example Google Assistant. Behind Google Assistant is, without a doubt, an ingenious machine learning algorithm (probably a combination of BERT, LSTMs and God knows what else). But do you think that this amazing research alone is capable of answering the queries of millions of users at the same time? Absolutely not. There are dozens of software engineers behind the scenes, who maintain, optimize, and build the system. This is exactly what we are about to discover.
One last thing before we begin. “Deep Learning in Production” isn’t going to be one of those high-level, abstract articles that talk too much without practical value. Here we are going to go really deep into software, we will analyze details that may seem too low level, we will write a lot of code and we will present the full deep learning software development cycle from start to end. From a notebook to serving millions of users.
From research to production
But enough with the pitching (I hope you are convinced by now). Let’s cut to the chase with an overview of the upcoming articles. Note that each bullet is not necessarily a separate article (it could be 2 or 3). I am just outlining all the subjects we will touch.
Setup your laptop and environment.
Best practises to structure your python code and develop the model.
Optimize the performance of the code in terms of latency, memory etc.
Train the model in the cloud.
Build an API to serve the model.
Containerize and deploy the model in the cloud.
Scale it to handle loads of traffic.
In this aspect, some of the technologies, frameworks and tools we will use (in random order):
Python, Pycharm, Anaconda, Tensorflow, Git and Github, Flask, WSGI, Docker, Kubernetes, Google Cloud and probably much more.
Along the process, I will also give you some extra tips to better utilize the tools, increase your productivity and enhance your workflow.
Let’s get started with some context first.
For the basis of our project, we will use an official tutorial form Tensorflow in which the authors use a slightly modified U-Net to perform image segmentation. You can find the colab notebook in the official docs here or in our Github repo here.
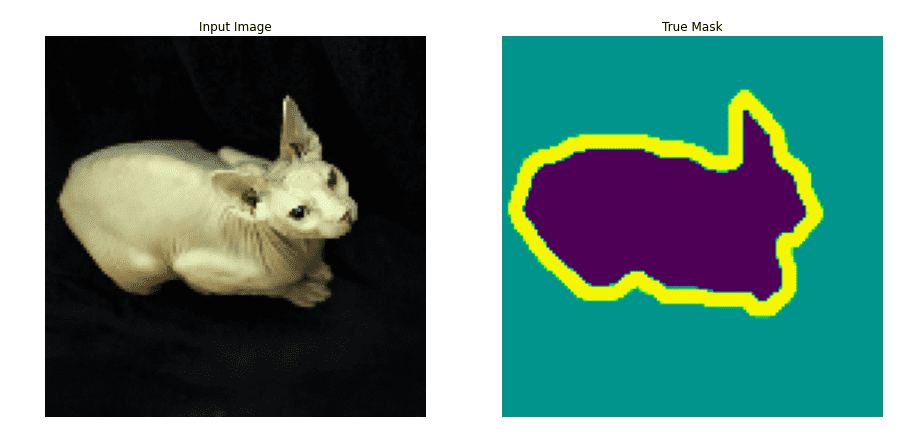
I won’t go into much details but basically semantic segmentation is the task of assigning a label to every pixel of an image based on its context. This is super useful because it enables computers to understand what they see. And I’m confident you can think of many applications that would be helpful. Some of them include autonomous cars, robotics and medical imaging.
A well known model that is used in image segmentation are UNets. UNets are symmetric convolutional neural networks that consist of an encoder and a decoder. But instead of being a linear shaped model, every layer of the encoder connects with a layer of the decoder via skip connections. The result is to have a U shaped Network, hence their name.
But since UNets are not what we are focusing here, I will prompt you to another article of ours if you need more information. Check this out .
base_model = tf.keras.applications.MobileNetV2(input_shape=[128, 128, 3], include_top=False)# Use the activations of these layerslayer_names = ['block_1_expand_relu', # 64x64'block_3_expand_relu', # 32x32'block_6_expand_relu', # 16x16'block_13_expand_relu', # 8x8'block_16_project', # 4x4]layers = [base_model.get_layer(name).output for name in layer_names]# Create the feature extraction modeldown_stack = tf.keras.Model(inputs=base_model.input, outputs=layers)down_stack.trainable = Falseup_stack = [pix2pix.upsample(512, 3), # 4x4 -> 8x8pix2pix.upsample(256, 3), # 8x8 -> 16x16pix2pix.upsample(128, 3), # 16x16 -> 32x32pix2pix.upsample(64, 3), # 32x32 -> 64x64]def unet_model(output_channels):inputs = tf.keras.layers.Input(shape=[128, 128, 3])x = inputs# Downsampling through the modelskips = down_stack(x)x = skips[-1]skips = reversed(skips[:-1])# Upsampling and establishing the skip connectionsfor up, skip in zip(up_stack, skips):x = up(x)concat = tf.keras.layers.Concatenate()x = concat([x, skip])# This is the last layer of the modellast = tf.keras.layers.Conv2DTranspose(output_channels, 3, strides=2,padding='same') #64x64 -> 128x128x = last(x)return tf.keras.Model(inputs=inputs, outputs=x)
If you are interested in more details about the UNet model and the architecture, you should check the official Tensorflow tutorial. It is truly amazing. I think it’s better not to go into details about the machine learning aspect because here we are focusing on the programming and software part of Deep Learning.
As you will see, the official notebook also includes some data loading functionalities, basic utils functions, the training process and code to predict the segmentation on the test data. But we will dive into them in time.
It’s time. You spent hours reading research papers, experimenting on different data, testing the accuracy of different models but you got it. After training your model locally, you’ve seen some pretty awesome results and you’re convinced that your model is ready to go. What’s next?
The next step is to take your experimentation code and migrate it into an actual python project with proper structure, unit tests, static code analysis, parallel processing etc.
But before that, we will need to set up our laptop. You’ve probably already done that but for consistency’s sake, I’ll describe the process to make sure we are on the same page and to familiarize ourselves with the tools I’m going to use in this course.
Setting up the environment for Deep Learning
I’m going to use Ubuntu 20.04 as my operating system and the standard Linux terminal. I highly recommend to install zsh instead of bash. The default linux shell on Ubuntu is bash and you will be totally fine with it. Zsh is an extension that comes with some cool features such as line completion, spelling correction, command history.
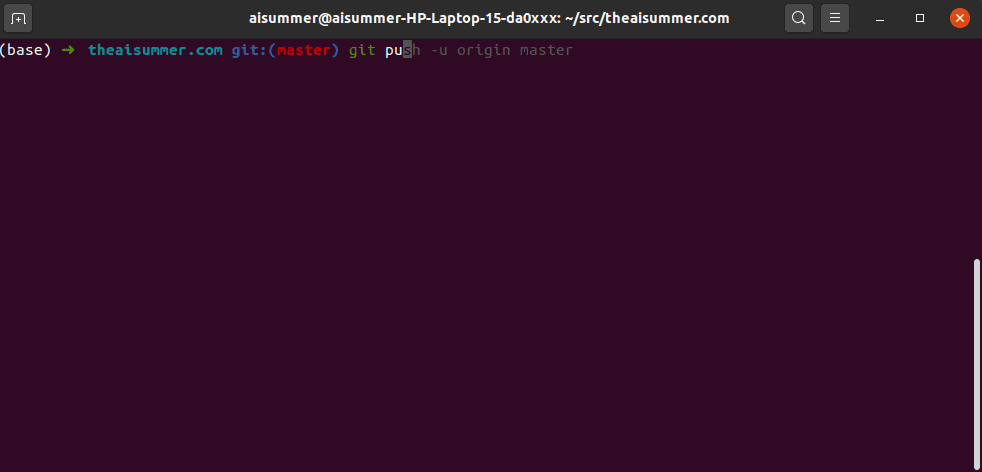
You can see how to install it in the link (note that instead of using homebrew as you would do on a mac, you can use apt-get to download it which is the standard packaging system in most linux distributions) and you can also take advantage of its amazing plugins such as zsh-syntax-highlighting and zsh-autosuggestions . Zsh will definitely come in handy when you want to switch python virtual environments and when you’re working with git and different branches. Below you can see how I set up my terminal (which is pretty minimal)
After setting up the terminal, it’s time to download some basic software. Git is the first one in our list.
Git and Github
Git is an open coursed version control system and is essential if you work with other developers on the same code as it lets you track who changed what, revert the code to a previous state and allow multiple people to change the same file. Git is used by the majority of developers nowadays and is probably the single most important tool in the list.
You can install and configure git using the following commands.:
sudo apt-get install git#configure git accountgit config --global user.name "AI Summer"git config --global user.email "sergios@theaisummer.com"
You should also use Github to save your code and collaborate with other engineers. Github is a great tool to review code, to track what you need to do and to make sure that you won’t lose your code no matter what. To be able to use it, you will need to set up an ssh key to be able to commit and push code from the terminal. Personally I use both git and github pretty much in all my projects (even if I’m the only the developer)
#to create the keyssh-keygen -t rsa -C "your_name@github.com"#to copy to your keyboardcat ~/.ssh/id_rsa.pub
Then go to your GitHub account in the browser -> Account settings -> ssh keys and add the ssh key you just copied.
Finally, run the below command to make sure everything went well.
ssh -T git@github.com
I also recommend Github Desktop to interact with GitHub using a GUI and not the command line, as it can sometimes be quite tedious.
Tip: Github Desktop doesn’t have a linux version but this awesome repo works perfectly fine and it’s what I personally use.
Next in our list is Anaconda
Anaconda and Miniconda
In order to isolate our deep learning environment from the rest of our system and to be able to test different library releases, virtual environments are the solution. Virtual environments lets you isolate the python installation with all the libraries that will be needed for a project. That way you can have for example both Python 2.7 and 3.6 on the same machine. A good rule of thumb is to have an environment per project.
One of the most popular python distributions out there is Anaconda, which is widely used by many data scientists and machine learning engineers, as it comes prebaked with a number of popular ML libraries and tools and it supports natively virtual environments. It also comes with a package manager (called conda) and a GUI as a way to manipulate libraries from there instead of the command line. And it’s what we will use. I will install the miniconda version, which includes only the necessary stuff, as I don’t want my pc to clutter with unnecessary libraries but feel free to get the full version.
# download minicondawget https://repo.anaconda.com/miniconda/Miniconda2-latest-Linux-x86_64.sh# install./sh Miniconda2-latest-Linux-x86_64.sh
At this point we would normally create a conda environment and install some basic python libraries. But we won’t. Because in the next step Pycharm will create one for us for free.
Pycharm
This is where many developers can become very opinionated on which ide/editor is the best. In my experience, it doesn’t really matter which one to use as long as it can increase your productivity and help you write and debug code faster. You can choose between VsCode, Atom, Emacs, Vim, Pycharm and more. In my case, Pycharm seems more natural as it provides some out of the box functionalities, such as integration with git and conda, unit testing and plugins like cloud code and bash support.
You can download the free community edition from here and create a new project.
Tip: When you create a project, Pycharm will ask you to select your python interpreter. In this step you can choose to create a new conda environment and the IDE will find your conda installation and create one for you without doing anything else. It will automatically activate it when starting the integrated terminal. In the whole course, I am going to use Python 3.7.7 so if you want to follow along, it would be better if we have the same version (any 3.7.x should work).
Once you create your project and create your conda environment, you will probably want to install some python libraries. There are two ways to do that:
Open the terminal and run “conda install library” inside your env
Go File->Settings->Project->Project Interpreter and install from here using Pycharm
Another cool feature of Pycharm is that it contains an integrated version control functionality (VCS). It will detect your git configuration in your project (if exists) and it will give you the ability to commit, pull, push and even open a PR (pull request) from the VCS menu tab (in case you don’t want to use either the terminal or GithubDesktop).
Other tools
Other tools which you might want to use, especially if you are part of a team are: ( and I’m not suggesting them because of an affiliate relationship or something. I’m using all of them in my daily life/work)
Slack is a very good tool to communicate with your team. And it come with a plethora of integrations such as github and google calendar.
Zenhub is a project management tool, specifically designed for Github. Since it’s not free, a very good alternative is the built-in projects functionality inside Github.
Zoom for video calls and meetings.
Now we are all set. Our laptop is rock solid, our environment is ready for some Deep Learning (sort of) and our tools are installed and properly configured.
My favorite time is here: Time to write some code!
Naah we still have a few things to talk about.
One parenthesis here: You know what distinguishes a good engineer from a great engineer? (and that’s, of course, my personal opinion)
His ability to plan and design the system before even touching the keyboard. Carefully thinking about the architecture, making informed decisions, discussing it with other engineers, and documenting things can save a lot of time beforehand. A whole lot of time. Trust me on this. I’m guilty of this more times than I’m proud to admit. That's why, this time we will do it the right way. Thus, it turns out it won’t be such a short parenthesis!
System Design for Deep Learning
One very important advice I learned over the years designing software is to always ask why. Keep in mind that machine learning is ordinary software and not some magic algorithm. It’s plain simple software and should be treated as one, especially when you think in terms of production level-software.
So, why use Python? Why do we need a server? Why run on the cloud and not locally? Why do we need GPUs? Why writing unit tests?
I will try to answer all those questions throughout the course and I hope to help you understand why some best practices are in fact best and why you should try to adopt them.
High level architecture
Let’s start first with a high-level overview of what we want to do.
Let’s assume that we have a website and for some reason we want to add an image segmentation functionality on that page. So the user will navigate to that page, click on a button to upload an image and then we will display back the result after we perform the segmentation.
 Taken from the tensorflow tutorial
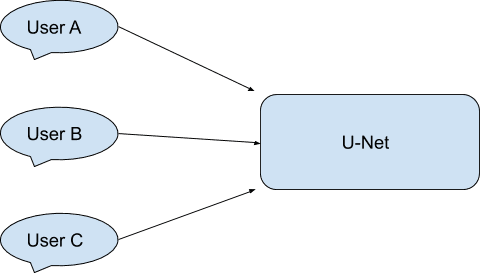
In terms of software, the flow is something like this: the user uploads the image to the browser, the browser sends the image to our backend, the UNet predicts the segmented image and we send the image back to the user’s browser, where it is rendered.
After watching the above system, there are many questions that come in our mind:
What will happen if many users ask the model at the same time?
What will happen if for some reason the model crashes?
If it contains a bug we haven’t previously seen?
If the model is too slow and the user has to wait for too long to get a response?
And how can we update our model?
Can we retrain it on new data?
Can we get some feedback if the model performs well?
Can we see how fast or slow the model is?
How much memory does it use?
Where do we store the model weights?
What about the training data?
What if the user sends a malicious request instead of a proper image?
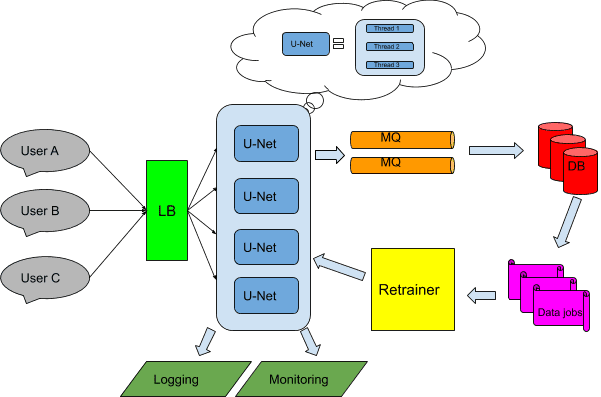
I can go on forever but I’m sure you get my point. Most of these questions will be answered in the following articles. That’s why in most real-life cases, the final architecture will be something like this:
Ok, we won’t go that far. That’s a whole startup up there. But we will cover many points focusing on optimizing the software at first and touching some of these parts on our latest articles.
Software design principles
But to develop our software, we need to have in mind a rough idea of our end goal and what we want to achieve. Every system should be built based on some basic principles:
Separation of concerns: The system should be modularized into different components with each component being a separate maintainable, reusable and extensible entity.
Scalability: The system needs to be able to scale as the traffic increases
Reliability: The system should continue to be functional even if there is software of hardware failure
Availability: The system needs to continue operating at all times
Simplicity: The system has to be as simple and intuitive as possible
Given the aforementioned principles, let’s discuss the above image:
Each user sends a request to our backend. To be able to handle all the simultaneous requests, first we need a Load Balancer (LB) to handle the traffic and route the requests to the proper server instance.
We maintain more than one instance of the model in order to achieve both scalability and availability. Note that these might be physical instances, virtual machines or docker containers and they are organized by a distributed system orchestrator (such as Kubernetes)
As you can probably see, each instance may have more than one threads or parallel processes. We need that to make sure that the model is fast enough to return a response in real time.
A major problem most machine learning systems face is retraining because in order for the model to stay up to date, you should constantly update the model weights based on the new data. In our case, this pipeline consists of:
A database (DB) to save the requests, the responses and all relative data
A message queue (MQ) to send them in the database in an asynchronous manner ( to keep the system reliable and available)
Data jobs to preprocess and transform the data in the correct format so that can be used from our model
Retrainer instances that execute the actual training based on the saved data
After retraining the model, the new version will gradually replace all the UNet instances. That way we build deep learning models versioning functionality, where we always update the model with the newest version.
Finally, we need some sort of monitoring and logging to have a complete image of what’s happening in our system, to catch errors quickly and to discover bottlenecks easily.
I’m pretty sure that some of you feel that I introduced a lot of new words in this section. Don’t worry. You aren’t gonna need all of these until the latest articles. But now, we have a pretty clear image of what we want to achieve and why we are going to need all these things I’m about to discuss on this course.
They will all address the principles I mentioned before.
As a side material, I strongly suggest the TensorFlow: Advanced Techniques Specialization course by deeplearning.ai hosted on Coursera, which will give you a foundational understanding on Tensorflow
Get ready for Software Engineering
In this article, I gave you two main tasks to finish while waiting for the next one:
Setting up your laptop and installing the tools that we will need throughout the course and
understand the whys of a modern deep learning system.
The first one is a low effort, kind of boring job that will increase your productivity and save you some time down the road so we can focus only on the software. The second one requires some mental effort because deep learning architectures are rather complex systems. But the main thing that you need to remember are the 5 principles as they will accompany us down the road.
We are all set up and ready to begin our journey towards deploying our UNet model and serve it to our users. As I said in the beginning, brace yourself to go deep into programming deep learning apps, to dive into details that you probably never thought of and most of all to enjoy the process.
If you are into this and you want to discover the software side of Deep Learning, join the AI Summer community, to receive our next article right into your inbox.
See you then...
References:
nobledesktop.com, What Is Git & Why Should You Use It?
realpython.com, Setting Up Python for Machine Learning on Windows
freecodecamp.org, How to Configure your macOs Terminal with Zsh like a Pro
github.com/donnemartin, The System Design Primer
* Disclosure: Please note that some of the links above might be affiliate links, and at no additional cost to you, we will earn a commission if you decide to make a purchase after clicking through.


