Apache Airflow has become the de facto library for pipeline orchestration in the Python ecosystem. It has gained popularity, contary to similar solutions, due to its simplicity and extensibility. In this article, I will attempt to outline its main concepts and give you a clear understanding of when and how to use it.
Why and when should I consider Airflow?
Imagine that you want to build a machine learning pipeline that consists of several steps such as:
Read an image dataset from a cloud-based storage
Process the images
Train a deep learning model with the downloaded images
Upload the trained model in the cloud
Deploy the model
How would you schedule and automate this workflow? Cron jobs are a simple solution but they come with many problems. Most importantly, they won’t allow you to scale effectively. On the other hand, Airflow offers the ability to schedule and scale complex pipelines easily. It also enables you to automatically re-run them after failure, manage their dependencies and monitor them using logs and dashboards.
Before we build the aforementioned pipeline, let’s understand the basic concepts of Apache Airflow.
What is Airflow?
Apache Airflow is a tool for authoring, scheduling, and monitoring pipelines. As a result, is an ideal solution for ETL and MLOps use cases. Example use cases include:
Extracting data from many sources, aggregating them, transforming them, and store in a data warehouse.
Extract insights from data and display them in an analytics dashboard
Train, validate, and deploy machine learning models
Key components
When installing Airflow in its default edition, you will see four different components.
Webserver: Webserver is Airflow’s user interface (UI), which allows you to interact with it without the need for a CLI or an API. From there one can execute, and monitor pipelines, create connections with external systems, inspect their datasets, and many more.
Executor: Executors are the mechanism by which pipelines run. There are many different types that run pipelines locally, in a single machine, or in a distributed fashion. A few examples are
LocalExecutor,SequentialExecutor,CeleryExecutorandKubernetesExecutorScheduler: The scheduler is responsible for executing different tasks at the correct time, re-running pipelines, backfilling data, ensuring tasks completion, etc.
PostgreSQL: A database where all pipeline metadata is stored. This is typically a Postgres but other SQL databases are supported too.

The easiest way to install Airflow is using docker compose. You can download the official docker compose file from here:
$ curl -LfO 'https://airflow.apache.org/docs/apache-airflow/2.5.1/docker-compose.yaml'
Note that Airflow also resides on Pypi and can be downloaded using
pip
Basic concepts of Airflow
In order to get started with Airflow, one has to be familiar with its main concepts, which can be a little tricky. So let’s try to demystify them.
DAGs
All pipelines are defined as directed acyclic graphs (DAGs). Any time we execute a DAG, an individual run is created. Each DAG run is separate from another and contains a status regarding the execution stage of the DAG. This means that the same DAGs can be executed many times in parallel.

To instantiate a DAG, you can use the DAG function or with a context manager as follows:
from airflow import DAGwith DAG("mlops",default_args={"retries": 1,},schedule=timedelta(days=1),start_date=datetime(2023, 1, 1)) as dag:# dag code goes here
The context manager accepts some global variables regarding the DAG and some default arguments. The default arguments are passed into all tasks and can be overridden on a per-task basis. The complete list of parameters can be found on the official docs.
In this example, we define that the DAG will start on 1/1/2023 and will be executed each day. The retries argument ensures that it will be re-run once after a possible failure.
Tasks
Each node of the DAG represents a Task, meaning an individual piece of code. Each task may have some upstream and downstream dependencies. These dependencies express how tasks are related to each other and in which order they should be executed. Whenever a new DAG run is initialized, all tasks are initialized as Task instances. This means that each Task instance is a specific run for the given task.

Operators
Operators can be viewed as templates for predefined tasks because they encapsulate boilerplate code and abstract much of their logic. Some common operators are BashOperator, PythonOperator, MySqlOperator, S3FileTransformOperator. As you can tell, the operators help you define tasks that follow a specific pattern. For example, the MySqlOperator creates a task to execute a SQL query and the BashOperator executes a bash script.
Operators are defined inside the DAG context manager as below. The following code creates two tasks, one to execute a bash command and one to execute a MySQL query.
with DAG("tutorial") as dag:task1 = BashOperator(task_id="print_date",bash_command="date",)task2 = MySqlOperator(task_id="load_table",sql="/scripts/load_table.sql")
Task dependencies
To form the DAG’s structure, we need to define dependencies between each task. One way is to use the >> symbol as shown below:
task1 >> task2 >> task3
Note that one task may have multiple dependencies:
task1 >> [task2, task3]
The other way is through the set_downstream, set_upstream functions:
t1.set_downstream([t2, t3])
XComs
XComs, or cross communications, are responsible for communication between tasks. XComs objects can push or pull data between tasks. More specifically, they push data into the metadata database where other tasks can pull from. That’s why there is a limit to the amount of data that can be passed through them. However, if one needs to transfer large data, they can use suitable external data storages such as object storage or NoSQL databases.

Take a look at the following code. The two tasks are communicating via xcoms using the ti argument (short for task instance). The train_model task is pushing the model_path into the metadata database, which is pulled by the deploy_model task.
dag = DAG('mlops_dag',)def train_model(ti):model_path = train_and_save_model()ti.xcom_push(key='model_path', value=model_path)def deploy_model(ti):model_path = ti.xcom_pull(key='model_path', task_ids='train_model')deploy_trained_model(model_path)train_model_task = PythonOperator(task_id='train_model',python_callable=train_model,dag=dag)deploy_model_task = PythonOperator(task_id='deploy_model',python_callable=deploy_model,dag=dag)train_model_task >> deploy_model_task
Taskflow
The Taskflow API is an easy way to define a task using the Python decorator @task. If all the task’s logic can be written with Python, then a simple annotation can define a new task. Taskflow automatically manages dependencies and communications between other tasks.
Using the Taskflow API, we can initialize a DAG with the @dag decorator. Here is an example:
@dag(start_date=datetime(2023, 1, 1),schedule_interval='@daily')def mlops():@taskdef load_data():. . .return df@taskdef preprocessing(data):. . .return data@taskdef fit(data):return Nonedf = load_data()data = preprocessing(df)model = fit(data)dag = mlops()
Note that dependencies between tasks are implied through each function arguments. Here we have a simple chaining order but things can get much more complex. Taskflow API also solves the communication problem between tasks, so there is a limited need to use XComs.
Scheduling
Scheduling jobs is one of the core features of Airflow. This can be done using the schedule_interval argument which receives a cron expression, a datetime.timedelta object, or a predefined preset such as @hourly, @daily etc. A more flexible approach is to use the recently added timetables that let you define custom schedules using Python.
Here is an example of how to use the schedule_interval argument. The below DAG will be executed daily.
@dag(start_date=datetime(2023,1,1),schedule_interval = '@daily',catchup =False)def my_dag():pass
Two very important concepts you need to understand regarding scheduling are backfilling and catchup.
Once we define a DAG, we set up a start date and a schedule interval. If catchup=True, Airflow will create DAG runs for all schedule intervals from the start date until the current date. If catchup=False, Airflow will schedule only runs from the current date.
Backfilling extends this idea by enabling us to create past runs from the CLI irrespective of the value of the catchup parameter:
$ airflow backfill -s <START_DATE> -e <END_DATE> <DAG_NAME>

Connections and Hooks
Airflow provides an easy way to configure connections with external systems or services. Connections can be created using the UI, as environment variables, or through a config file. They usually require a URL, authentication info and a unique id. Hooks are an API that abstracts communication with these external systems. For example, we can define a PostgreSQL connection through the UI as follows:

And then use the PostgresHook to establish the connection and execute our queries:
pg_hook = PostgresHook(postgres_conn_id='postgres_custom')conn = pg_hook.get_conn()cursor = conn.cursor()cursor.execute('create table _mytable (ModelID int, ModelName varchar(255)')cursor.close()conn.close()
Advanced concepts
To keep this tutorial as self-complete as possible, I need to mention a few more advanced concepts. I won’t go into many details for each one of them but I highly urge you to check them out, if you want to master Airflow.
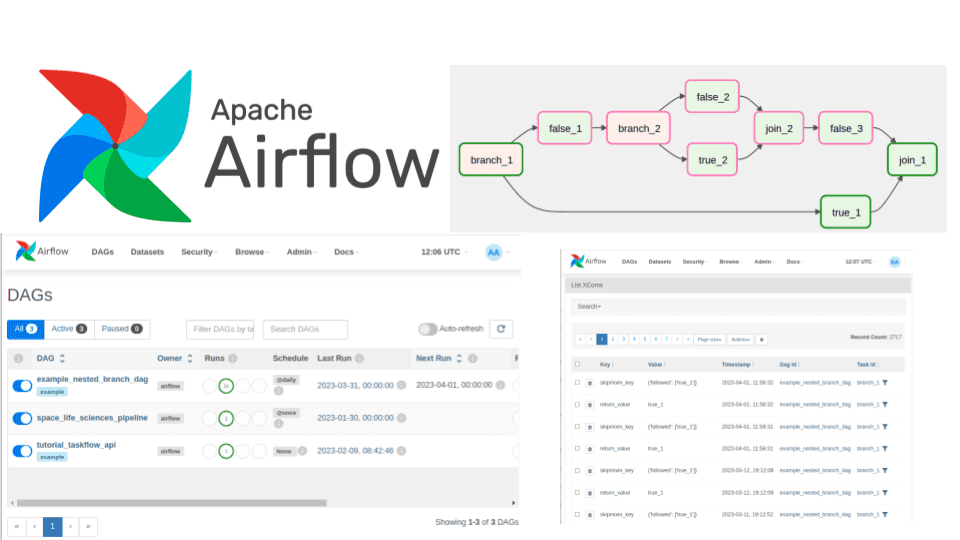
Branching: Branching allows you to divide a task into many different tasks either for conditioning your workflow or for splitting the processing. The most common way is
BranchPythonOperator.Task Groups: Task Groups help you organize your tasks in a single unit. It’s a great tool to simplify your graph view and for repeating patterns.
Dynamic Dags: Dags and tasks can also be constructed in a dynamic way. Since Airflow 2.3, dags and tasks can be created at runtime which is ideal for parallel and input-dependent tasks. Jinga templates are also supported by Airflow and are a very helpful addition to dynamic dags.
Unit tests and logging: Airflow has dedicated functionality for running unit tests and logging information
Airflow best practices
Before we see a hands-on example, let’s discuss a few best practices that most practitioners use.
Idempotency: DAGs and tasks should be idempotent. Reexecuting the same DAG run with the same inputs should always have the same effect as executing it once.
Atomicity: Tasks should be atomic. Each task should be responsible for a single operation and independent from the other tasks
Incremental filtering: Each DAG run should process only a batch of data supporting incremental extracting and loading. That way possible failures won’t affect the entire dataset.
Top-level code: Top-level code should be avoided if it’s not for creating operators or dags because it will affect performance and loading time. All code should be inside tasks, including imports, database access, and heavy computations
Complexity: DAGs should be kept as simple as possible because high complexity may impact performance or scheduling
Example of an Airflow pipeline
To demonstrate all the aforementioned concepts, let’s go back to the example workflow mentioned at the beginning of this article. We will develop a pipeline that trains a model and deploy it in Kubernetes. More specifically, the DAG will consist of 5 tasks:
Read images from an AWS s3 bucket
Preprocess the images using Pytorch
Fine-tune a ResNet model with the downloaded images
Upload the model in S3
Deploy the model in a Kubernetes Cluster
Note that I will not include all the specific details and the necessary code, only the parts that are related to Airflow.
First, let’s start by defining the DAG. As you can see, the pipeline will execute once a day. In case of failure, there will be a single retry after one hour. Moreover, there will be no catchup despite the fact that the pipeline is supposed to start two days ago.
from airflow import DAGimport datetimedefault_args = {'owner': 'airflow','depends_on_past': False,'start_date': airflow.utils.dates.days_ago(2),'retries': 1,'retry_delay': datetime. timedelta(hours=1),}dag = DAG('resnet_model',default_args=default_args,description='A simple DAG to demonstrate Airflow with PyTorch and Kubernetes',schedule_interval='@daily',catchup=False)
The first task is responsible for reading the images from AWS S3. To accomplish that, we can use the S3Hook. We first define the reading functionality in a function and then the corresponding PythonOperator. Note that here I use the default AWS connection, but in most cases, you will need to define your own.
from airflow.providers.amazon.aws.hooks.s3 import S3Hookdef read_images_from_s3(**kwargs):s3_conn = S3Hook(aws_conn_id='aws_default')images = []for obj in s3_conn.get_bucket('mybucket').objects.all():images.append(obj.key)kwargs['ti'].xcom_push(key='images', value=images)read_images = PythonOperator(task_id='read_images',python_callable=read_images_from_s3,provide_context=True,dag=dag)
Next in line are the transform and fit functions. I won’t include them here in their entirety because they are mostly standard Pytorch code.
def preprocess_images(images, **kwargs):images = kwargs['ti'].xcom_pull(task_ids='read_images_from_s3', key='images')# Perform basic preprocessing using PyTorchkwargs['ti'].xcom_push(key='images', value=train_images)def fit_model(preprocessed_images, **kwargs):train_ images = kwargs['ti'].xcom_pull(task_ids=preprocess_images, key='train_images')# Fit the using PyTorchtorch.save(model, 'trained_model.pt')preprocess = PythonOperator(task_id='preprocess',python_callable=preprocess,provide_context=True,dag=dag)fit_model = PythonOperator(task_id='fit_model',python_callable=fit_model,provide_context=True,dag=dag)
Once the model is trained, we need to upload it in S3 so we can load it and serve requests. This can be done using the S3FileTransferOperator, which reads from the local file system and upload it to S3.
from airflow.operators.s3_file_transform_operator import S3FileTransformOperatorupload_model = S3FileTransferOperator(task_id='upload_model',source_base_path='.',source_key='trained_model.pt',dest_s3_bucket='my-model-bucket',dest_s3_key='trained_model.pt',dag=dag)
The final step is to create a Kubernetes pod and serve the model. The best way to achieve that is by using the KubernetedPodExecutor. Assuming that we have a deployment script that handles the model loading and serving (which will not analyze here), we can do something as follows:
from airflow.providers.cncf.kubernetes.operators.kubernetes_pod import KubernetesPodOperatordeploy_model = KubernetesPodOperator(namespace='default',image='myimage:latest',name='deploy-model',task_id='deploy_model',cmds=['python', 'deploy.py'],arguments=[model],is_delete_operator_pod=True,hostnetwork=False,dag=dag)
The KubernetesPodOperator uses the Kubernetes API to launch a pod in a Kubernetes cluster and execute the deployment script.
Once we have defined all tasks, we simply need to create their dependencies and form the DAG. This is as simple as:
read_images >> preprocess >> fit_model >> upload_model >> deploy_model
And that’s all. This DAG will be initialized by Airflow and can be monitored through the UI. The scheduler will be responsible for executing the tasks in the correct order and at the proper time.
Conclusion
Apache Airflow is a great data engineering tool in my honest opinion. Sure, it has some shortcomings but can also be very flexible and scalable. If you want to dive deeper, I have two resources to suggest:
A course by IBM on Coursera: ETL and Data Pipelines with Shell, Airflow and Kafka. By the way, the entire certification on data engineering by IBM is pretty great.
Data Engineering with AWS Nanodegree from AWS in Udacity. The 4th module in particular focuses heavily on Airflow.
Let us know if you’d like to see more tutorials on popular data engineering libraries. If you’re new to AI Summer, don’t forget to follow us on X or Linkedin, to stay updated with our latest articles.

* Disclosure: Please note that some of the links above might be affiliate links, and at no additional cost to you, we will earn a commission if you decide to make a purchase after clicking through.