In this tutorial, we will explore TensorFlow Extended (TFX). TFX was developed by Google as an end-to-end platform for deploying production ML pipelines. Here we will see how we can build one from scratch. We will explore the different built-in components that we can use, which cover the entire lifecycle of machine learning. From research and development to training and deployment.
But first, let’s start with some basic concepts and terminology to make sure that we are all on the same page.
I highly recommend the ML Pipelines on Google Cloud course by the Google cloud team or the Advanced Deployment Scenarios with TensorFlow by DeepLearning.ai to improve your skills with a holistic course.
TFX glossary
Components are the building blocks of a pipeline and are the ones that perform all the work. Components can be used intact or can be overridden with our own code.
Metadata store is the single source of truth for all components. It contains 3 things basically:
Artifacts and their properties: these can be trained models, data, metrics
Execution records of components and pipelines
Metadata about the workflow (order of components, inputs, outputs, etc)
TFX pipeline is a portable implementation of an ML workflow that is composed of component instances and input parameters
Orchestrators are systems that execute TFX pipelines. They are basically platforms to author, schedule, and monitor workflows. They usually represent a pipeline as a Directed Acyclic Graph and make sure that each job (or a worker) is executed at the correct time with the correct input.
Examples of popular orchestrators that work with TFX are Apache Airflow, Apache Beam, Kubeflow pipelines
Based on the different stages of the machine learning lifecycle, TFX provides a set of different components with standard functionality. These components can be overridden. For example, we may want to extend their functionality. They can also be replaced by entirely new ones. In most cases, though, the built-in components will take most of us a long way down the road.
Let’s do a quick walkthrough on all of them starting with data loading and ending to deployment. Note that we will not dive deep into the code because there are a lot of new libraries and packages that most are unfamiliar with.
The whole point is to give you an overview of TFX and its modules and help you understand why we need such end-to-end solutions
Data Ingestion
The first phase of the ML development process is data loading. The ExampleGen component ingests data into a TFX pipeline by converting different types of data to tf.Record or tf.Example ( both supported by TFX). Sample code can be found below:
from tfx.proto import example_gen_pb2from tfx.components import ImportExampleGeninput_config = example_gen_pb2.Input(splits=[example_gen_pb2.Input.Split(name='train', pattern='train/*'),example_gen_pb2.Input.Split(name='eval', pattern='test/*')])example_gen = ImportExampleGen(input_base=data_root, input_config=input_config)
ImportExampleGen is a special type of ExampleGen that receives a data path and a configuration on how to handle our data. In this case, we split them into training and test datasets.
Data Validation
The next step is to explore our data, visualize it and validate it for possible inaccuracies and anomalies.
The StatisticsGen component generates a set of useful statistics describing our data distribution. As you can see it receives the output of ExampleGen
from tfx.components import StatisticsGenstatistics_gen = StatisticsGen(examples=example_gen.outputs['examples'])
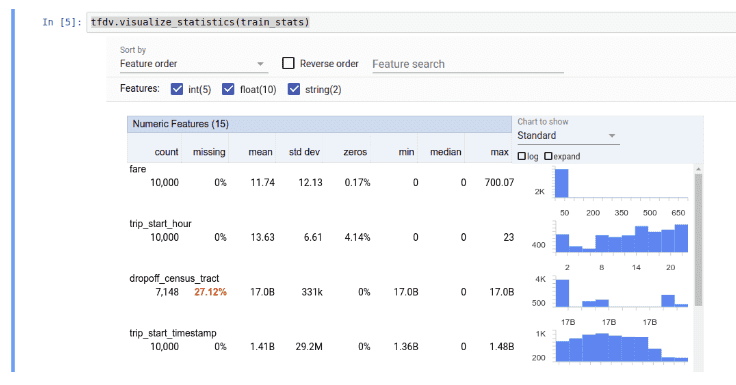
Tensorflow Data Validation is a built-in TFX library that, among other things, can help us visualize the statistics produced by StatisticsGen. It is used internally by StatisticsGen but can also be used as a standalone tool.
import tensorflow_data_validation as tfdvtfdv.visualize_statistics(stats)
The same library is being used by SchemaGen, which generated a primitive schema for our data. This can be of course adjusted based on our domain knowledge but it is a decent starting point.
from tfx.components import SchemaGenschema_gen = SchemaGen( statistics=statistics_gen.outputs['statistics'], infer_feature_shape=True)
The schema and the statics produced can now be utilized in order to perform some form of data validation that will catch outliers, anomalies, and errors in our dataset.
from tfx.components import ExampleValidatorexample_validator = ExampleValidator(statistics=statistics_gen.outputs['statistics'],schema=schema_gen.outputs['schema'])
Feature Engineering
One of the most important steps in any ML pipeline is feature engineering. Basically, we preprocess our data so that it can be passed to our model. TFX provides the Transform component and the tensorflow_transform library to help us with the task. The transform step can be performed like this:
from tfx.components import Transformtransform = Transform(examples=example_gen.outputs['examples'],schema=schema_gen.outputs['schema'],module_file=module_file)
But that’s not the entire story.
We need to define our preprocessing functionality somehow. This is where the argument module_file comes in. The most usual way to do that is to have a different file with all of our transformations. Essentially, we need to implement a preprocessing_fn function which is the point of entrance for TFX.
Here is a sample I borrowed from the official TFX examples:
def preprocessing_fn(inputs):"""tf.transform's callback function for preprocessing inputs."""outputs = {}image_features = tf.map_fn(lambda x: tf.io.decode_png(x[0], channels=3),inputs[_IMAGE_KEY],dtype=tf.uint8)image_features = tf.cast(image_features, tf.float32)image_features = tf.image.resize(image_features, [224, 224])image_features = tf.keras.applications.mobilenet.preprocess_input(image_features)outputs[_transformed_name(_IMAGE_KEY)] = image_featuresoutputs[_transformed_name(_LABEL_KEY)] = inputs[_LABEL_KEY]return outputs
Normal Tensorflow and Keras code as you can see.
Model training
Training the model is a vital part of the process and in contrast to what many people believe, is not a one-time operation.
Models need to be retrained constantly to stay relevant and ensure the best possible accuracy in their results.
from tfx.dsl.components.base import executor_specfrom tfx.proto import trainer_pb2from tfx.components.trainer.executor import GenericExecutorfrom tfx.components import Trainertrainer = Trainer(module_file=module_file,custom_executor_spec=executor_spec.ExecutorClassSpec(GenericExecutor),examples=transform.outputs['transformed_examples'],transform_graph=transform.outputs['transform_graph'],schema=schema_gen.outputs['schema'],train_args=trainer_pb2.TrainArgs(num_steps=160),eval_args=trainer_pb2.EvalArgs(num_steps=4),custom_config={'labels_path': labels_path})
As before, the training logic is in a separate module file. This time we have to implement the run_fn function, which normally defines the model and training loop. Again borrowed from the official examples and stripped from some unnecessary stuff, here is an example:
import tensorflow_transform as tftdef run_fn(fn_args: FnArgs):tf_transform_output = tft.TFTransformOutput(fn_args.transform_output)train_dataset = _input_fn(fn_args.train_files,tf_transform_output,is_train=True,batch_size=_TRAIN_BATCH_SIZE)eval_dataset = _input_fn(fn_args.eval_files,tf_transform_output,is_train=False,batch_size=_EVAL_BATCH_SIZE)model, base_model = _build_keras_model()model.compile(loss='sparse_categorical_crossentropy',optimizer=tf.keras.optimizers.RMSprop(lr=_FINETUNE_LEARNING_RATE),metrics=['sparse_categorical_accuracy'])model.summary(print_fn=absl.logging.info)model.fit(train_dataset,epochs=_CLASSIFIER_EPOCHS,steps_per_epoch=steps_per_epoch,validation_data=eval_dataset,validation_steps=fn_args.eval_steps,callbacks=[tensorboard_callback])
Note that the _build_keras_model returns a vanilla tf.keras.Sequential model, while input_fn returns a batched dataset of training examples and labels.
Check the official git repo for the full code. Also be sure that with the correct callbacks, we can take advantage of Tensorfboard to visualize the training progress.
Model validation
Next in line is model validation. Once we train a model, we have to evaluate it and analyze its performance before we push it into production. TensorFlow Model Analysis (TFMA) is a library for that particular thing. Notice here that this actual model evaluation has already happened during training.
This step intends to record evaluation metrics for future runs and compare them with previous models.
That way we can be sure that our current model is the best we have at the moment.
I will not go into the details of TFMA but here is some code for future reference:
import tensorflow_model_analysis as tfmaeval_config = tfma.EvalConfig(model_specs=[tfma.ModelSpec(label_key='label_xf', model_type='tf_lite')],slicing_specs=[tfma.SlicingSpec()],metrics_specs=[tfma.MetricsSpec(metrics=[tfma.MetricConfig(class_name='SparseCategoricalAccuracy',threshold=tfma.MetricThreshold(value_threshold=tfma.GenericValueThreshold(lower_bound={'value': 0.55}),# Change threshold will be ignored if there is no# baseline model resolved from MLMD (first run).change_threshold=tfma.GenericChangeThreshold(direction=tfma.MetricDirection.HIGHER_IS_BETTER,absolute={'value': -1e-3})))])])
The important part is where we define out Evaluator component as a part of our pipeline
from tfx.components import Evaluatorevaluator = Evaluator(examples=transform.outputs['transformed_examples'],model=trainer.outputs['model'],baseline_model=model_resolver.outputs['model'],eval_config=eval_config)
Push the model
Once the model validation succeeds, it’s time to push the model into production. This is the job of the Pusher component, which handles all the deploying stuff depending on our environment.
from tfx.components import Pusherpusher = Pusher(model=trainer.outputs['model'],model_blessing=evaluator.outputs['blessing'],push_destination=pusher_pb2.PushDestination(filesystem=pusher_pb2.PushDestination.Filesystem(base_directory=serving_model_dir)))
Build a TFX pipeline
Ok, we defined a number of components so far that contain everything we need. But how do we tie them together? TFX pipelines are defined using the pipeline class, which receives a list of components among other things.
from tfx.orchestration import metadatafrom tfx.orchestration import pipelinecomponents = [example_gen, statistics_gen, schema_gen, example_validator, transform,trainer, model_resolver, evaluator, pusher]pipeline = pipeline.Pipeline(pipeline_name=pipeline_name,pipeline_root=pipeline_root,components=components,enable_cache=True)
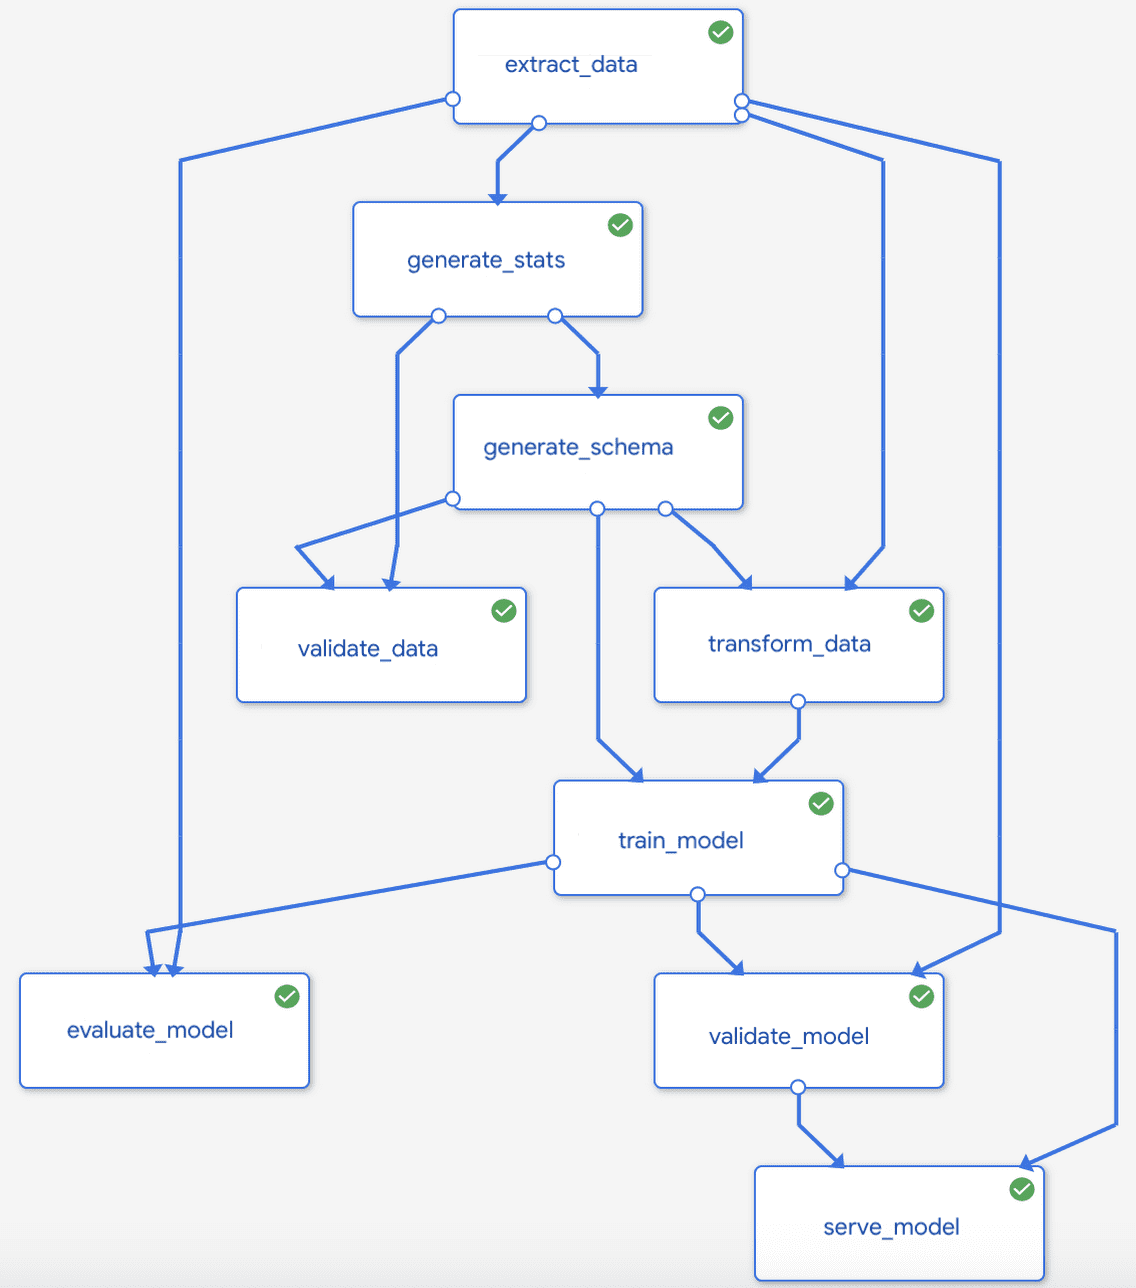
Component instances produce artifacts as outputs and typically depend on artifacts produced by upstream component instances as inputs. The order of execution of the components is determined by a Direct Acyclic Graph (DAG) based on each artifact's dependencies. Here is a typical TFX pipeline:
 Source: Google cloud platform Docs
Run a TFX pipeline
At last, we reach the part where we will run the pipeline. As we already said, pipelines are executed by an orchestrator, which will handle all the job scheduling and the networking. Here I chose Apache Beam using BeamDagRunner but the same principles are true for Kubeflow or Airflow.
from tfx.orchestration.beam.beam_dag_runner import BeamDagRunnerif __name__ == '__main__':BeamDagRunner().run( pipeline)
Also, I should mention that similar commands can be executed from the command line using the TFX CLI.
I’m sure it goes without saying that orchestrators like Apache beam in 99% of use cases will run on cloud resources.
This means Beam will spin up cloud instances/workers and stream data through them. That will be depending on the environment and the pipeline.
Typical runners below Apache Beam include Spark, Flink, Google Dataflow. On the other hand, frameworks like Kubeflow rely on Kubernetes. So one important job of MLOps engineers is to find the best environment for their needs.
Conclusion
End-to-end machine learning systems have gained a lot of attention over the past years. MLOps is starting to become more and more relevant as many different startups and frameworks have been born. One perfect example is TFX. I have to admit that building such pipelines is not an easy task and it requires a deep dive into the intricacies of TFX. But I think it’s one of the best tools we have in our arsenal at the moment. So the next time you want to deploy a machine learning model, maybe it’s worth giving it a shot.
As a side note, I have to prompt you again to ML Pipelines on Google Cloud course by the Google cloud team or the Advanced Deployment Scenarios with TensorFlow by DeepLearning.ai.
* Disclosure: Please note that some of the links above might be affiliate links, and at no additional cost to you, we will earn a commission if you decide to make a purchase after clicking through.
