This article serves as an all-in tutorial of the Hugging Face ecosystem. We will explore the different libraries developed by the Hugging Face team such as transformers and datasets. We will see how they can be used to develop and train transformers with minimum boilerplate code. To better elaborate the basic concepts, we will showcase the entire pipeline of building and training a Vision Transformer (ViT).
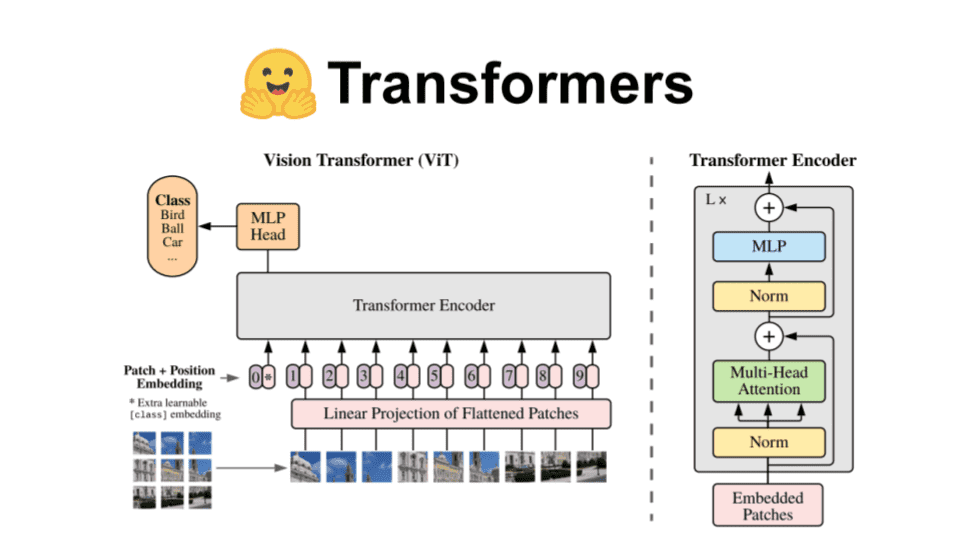
I assume that you already are familiar with the architecture so we won’t analyze much about it. A few things to remember are:
In ViT, we represent an image as a sequence of patches .
The architecture resembles the original Transformer from the famous “Attention is all you need” paper.
The model is trained using a labeled dataset following a fully-supervised paradigm.
It is usually fine-tuned on the downstream dataset for image classification.
If you are interested in a holistic view of the ViT architecture, visit one of our previous articles on the topic: How the Vision Transformer (ViT) works in 10 minutes: an image is worth 16x16 words.

Back to Hugging face which is the main objective of the article. We will strive to present the fundamental principles of the libraries covering the entire ML pipeline: from data loading to training and evaluation.
Shall we begin?
Datasets
The datasets library by Hugging Face is a collection of ready-to-use datasets and evaluation metrics for NLP. At the moment of writing this, the datasets hub counts over 900 different datasets. Let’s see how we can use it in our example.
To load a dataset, we need to import the load_dataset function and load the desired dataset like below:
from datasets import load_datasettrain_ds, test_ds = load_dataset('cifar10', split=['train[:5000]', 'test[:2000]'])
Notice that here we load only a portion of the CIFAR10 dataset. Using load_dataset, we can download datasets from the Hugging Face Hub, read from a local file, or load from in-memory data. We can also configure it to use a custom script containing the loading functionality.
Typically, the dataset will be returned as a datasets.Dataset object which is nothing more than a table with rows and columns. Querying a row will return a python dictionary with keys corresponding to the column names and values to the value in this particular row-column cell. In other words, each row corresponds to a data-point and each column to a feature. We can get the entire structure of the dataset using datasets.features.
A Dataset object is behaving like a Python list so we can query as we’d normally do with Numpy or Pandas:
A single row is
dataset[3]A batch is
dataset:[3:6]A column is
dataset[‘feature_1’]
Everything is a Python object but that doesn’t mean that it can’t be converted into NumPy, pandas, PyTorch or TensorFlow. This can be very easily accomplished using datasets.Dataset.set_format(), where the format is one of 'numpy', 'pandas', 'torch', 'tensorflow'.
No need to say that there is also support for all types of operations. To name a few: sort, shuffle, filter, train_test_split, shard, cast, flatten and map . map is , of course, the main function to perform transformations and as you’d expect is parallelizable.
In our example, we first need to split the training data into a training and a validation dataset:
splits = train_ds.train_test_split(test_size=0.1)train_ds = splits['train']val_ds = splits['test']
Metrics
The datasets library also provides a wide list of metrics that can be used when training models. The main object here is a datasets.Metric and can be utilized into two ways:
We can either load an existing metric from the Hub using
datasets.load_metric(‘metric_name’)Or we can define a custom metric in a separate script and load it using: `load_metric('PATH/TO/MY/METRIC/SCRIPT')```
from datasets import load_metricmetric = load_metric("accuracy")
Transformers
Transformers is the main library by Hugging Face. It provides intuitive and highly abstracted functionalities to build, train and fine-tune transformers. It comes with almost 10000 pretrained models that can be found on the Hub. These models can be built in Tensorflow, Pytorch or JAX (a very recent addition) and anyone can upload his own model.
Alongside with our example code, we will dive a little deeper into the main classes and features of the transformers library.
Pipelines
The pipeline abstraction is an intuitive and easy way to use a model for inference. They abstract most of the code from the library and provide a dedicated API for a variety of tasks. Examples include: AutomaticSpeechRecognitionPipeline, QuestionAnsweringPipeline , TranslationPipeline and more.
The pipeline object lets us also define the pretrained model as well as the tokenizer, the feature extractor, the underlying framework and more. Tokenizer and feature extractors? What are those? Hold that thought for the next section.
In our case, we can use the transformers.ImageClassificationPipeline as below:
from transformers import ViTForImageClassificationmodel = ViTForImageClassification.from_pretrained('google/vit-base-patch16-224')model.eval()
The model can now be used for inference. All we have to do is feed an image and we are good to go.
However, in many cases, we also need to train or fine tune a model. Perhaps we also want better control on the entire pipeline. Therefore, we might need to develop the code ourselves. For educational purposes, this is what we’ll do here.
Preparing the dataset
The first step to any ML lifecycle is to transform the dataset. In our case, we need to preprocess the CIFAR10 images so that we can feed them to our model. Hugging Face has two basic classes for data processing. Tokenizers and feature extractors.
Tokenizers
In most NLP tasks, a tokenizer is our go-to solution. A tokenizer is mapping the text into tokens and then into numerical inputs that can be fed into the model. Each model comes with its own tokenizer that is based on the PreTrainedTokenizer class.
Since we are dealing with images, we will not use a Tokenizer here. We will cover them more extensively in a future tutorial.
Feature Extractors
However, we will make use of another class called feature extractors. A feature extractor is usually responsible for preparing input features for models that don’t fall into the standard NLP models. They are in charge of things such as processing audio files and manipulating images. Most vision models come with a complementary feature extractor.
from transformers import ViTFeatureExtractorfeature_extractor = ViTFeatureExtractor.from_pretrained('google/vit-base-patch16-224-in21k')
This feature extractor will resize every image to the resolution that the model expects and normalize the channels. You can find the entire processing functionality here.
Now we can define the entire processing functionality as depicted below:
def preprocess_images(examples):images = examples['img']images = [np.array(image, dtype=np.uint8) for image in images]images = [np.moveaxis(image, source=-1, destination=0) for image in images]inputs = feature_extractor(images=images)examples['pixel_values'] = inputs['pixel_values']return examplesfrom datasets import Features, ClassLabel, Array3Dfeatures = Features({'label': ClassLabel(names=['airplane', 'automobile', 'bird', 'cat', 'deer', 'dog', 'frog', 'horse', 'ship', 'truck']),'img': Array3D(dtype="int64", shape=(3,32,32)),'pixel_values': Array3D(dtype="float32", shape=(3, 224, 224)),})preprocessed_train_ds = train_ds.map(preprocess_images, batched=True, features=features)preprocessed_val_ds = val_ds.map(preprocess_images, batched=True, features=features)preprocessed_test_ds = test_ds.map(preprocess_images, batched=True, features=features)
A few things to note here:
We need to define the
Featuresourselves to make sure that the input will be in the correct format.pixel_valuesis the main input a ViT model expects as one can inspect in the forward pass of the model.We use the
map()function to apply the transformations.ClassLabelandArray3Dare types of features from thedatasetslibrary.
Data collator
Another important step of the preprocessing pipeline is batching. We typically want to form batches from our dataset when training our model. Data collators are objects that help us do exactly that.
In our case, the default data collator provided from the library should be enough.
from transformers import default_data_collatordata_collator = default_data_collator
We will pass the data collator as an argument to the training loop. More on that in a while.
Defining the model
Pretrained transformer models can be loaded using the function from_pretrained(‘model_name’). This will instantiate the selected model and assign the trainable parameters. The model is by default in evaluation mode model.eval(), so we need to execute model.train() in order to train it.
from transformers import ViTForImageClassificationmodel = ViTForImageClassification.from_pretrained('google/vit-base-patch16-224-in21k')model.train()
Pretrained models can be used as a base for improved models. An example can be found below:
from transformers import ViTModelclass ViTForImageClassification2(nn.Module):def __init__(self, num_labels=10):super(ViTForImageClassification2, self).__init__()self.vit = ViTModel.from_pretrained('google/vit-base-patch16-224-in21k')self.classifier = nn.Linear(self.vit.config.hidden_size, num_labels)self.num_labels = num_labelsdef forward(self, pixel_values, labels):outputs = self.vit(pixel_values=pixel_values)logits = self.classifier(output)loss = Noneif labels is not None:loss_fct = nn.CrossEntropyLoss()loss = loss_fct(logits.view(-1, self.num_labels), labels.view(-1))return SequenceClassifierOutput(loss=loss,logits=logits,hidden_states=outputs.hidden_states,attentions=outputs.attentions,)
Here we extend the VitModel by adding a linear layer at the end, hoping to acquire a better representation of the input image. As you can imagine, we are able to modify the network as we want.
Modeling outputs
Did you notice the SequenceClassifierOutput at the end of the model?
The transformers library forces all the models to produce outputs that inherit the file_utils.ModelOutput class. The ModelOutput is a data structure that has all the information returned by the model. There are many different subclasses depending on the task at hand.
Typically a ModelOutput contains the output of the model and optionally the hidden states. In many models, the attention weights are also provided. Here we use the SequenceClassifierOutput which is the main output for classification models.
Training the model
Because of the lack of a standardized training-loop by Pytorch, Hugging Face provides its own training class. Trainer is especially optimized for transformers and provides an API for both normal and distributed training. Trainer lets us use our own optimizers, losses, learning rate schedulers, etc.
We can define our training loop as below:
trainer = Trainer(model,args,train_dataset = preprocessed_train_ds,eval_dataset = preprocessed_val_ds,data_collator = data_collator,compute_metrics = compute_metrics,)
Notice that we need to pass the model, the training dataset, the validation datasets, the data collator and a few other critical things.
compute_metrics is used to calculate the metrics during evaluation and is a custom function. An example might be something like this:
def compute_metrics(eval_pred):predictions, labels = eval_predpredictions = np.argmax(predictions, axis=1)return metric.compute(predictions=predictions, references=labels)
Here we simply take the model’s output, find the maximum value, and compute the metrics with respect to the corresponding label.
Training arguments
Training arguments are a set of arguments related to the training loop that are passed into the Trainer instance. These can include things such as: the path folder where outputs will be written, an evaluation strategy, the batch size per CPU/GPU core, the learning rate, the number of epochs and anything related to training.
Training arguments can be initialized as below:
args = TrainingArguments("test-cifar-10",evaluation_strategy = "epoch",learning_rate=2e-5,per_device_train_batch_size=10,per_device_eval_batch_size=4,num_train_epochs=3,weight_decay=0.01,load_best_model_at_end=True,metric_for_best_model=metric_name,logging_dir='logs',)trainer.train()
You can find the complete list in the official documentation.
Callbacks
Training callbacks couldn’t of course be missing. The ability to inspect the training process is a vital part of any machine learning lifecycle. Trainer supports a variety of callbacks that provide functionality to :
log training information.
visualize the training on Tensorflow.
early stop the process.
Apart from the above, they also offer integration with 3rd party software such as Weights and Biases, MlFlow, AzureML and Comet.
If for example we wanted to visualize the training process using the weights and biases library, we can use the WandbCallback. We can simply add another argument to the Trainer in the form of:
from transformers import WandbCallbackcallbacks = [WandbCallback(...)]
One other thing: Take a look at the logging_dir='logs'. By saving the training logs, we can very easily initiate a tensorboard instance and track the training progress:
$ tensorboard --logdir logs/
An alternative is to use the TensorBoardCallback provided by the library.
Evaluating the model
To evaluate the model on the test set, we can again use the Trainer object. This time we will take advantage of the predict function which will return the output of the models with the appropriate metrics (if available).
outputs = trainer.predict(preprocessed_test_ds)y_pred = outputs.predictions.argmax(1)
The metrics are available using outputs.metrics and contains things like the test loss, the test accuracy and the runtime.
Extra features
Finally, I take this opportunity to mention a few extra features of the transformers library that I find very helpful.
Logging
Transformers come with a centralized logging system that can be utilized very easily. Following the logging module of Python, It can be configured to set the format of the logs, the handler, and the verbosity into one of the 5 different levels: CRITICAL, ERROR, WARNING, INFO, DEBUG.
For example, one can set the verbosity to the INFO level using:
transformers.logging.set_verbosity_info()
Debugging
Another useful feature is the ability to catch underflow or overflow errors. We can configure the package to inspect inputs, output or weights, and determine if there are any ìnf or nan among them. As soon as an abnormality is detected, the program will print a report notifying the developer.
This can be accomplished by an extra training argument in the trainer instance: debug="underflow_overflow"
Note that this currently works only for Pytorch.
Auto classes
Auto classes are an inspired way to alleviate some of the pain of finding the correct model or tokenizer for a specific problem. What do I mean by that?
Imagine that you want to load the following pretrained DeiT model from the model hub:
facebook/deit-base-distilled-patch16-224.
Typically this will be accomplished by doing:
model= DeiTForImageClassification.from_pretrained( 'facebook/deit-base-distilled-patch16-224' )
Using an autoclass, this can be simplified into:
model = AutoModel.from_pretrained('facebook/deit-base-distilled-patch16-224')
In that case, we don’t need to know the corresponding model type. The autoclass will automatically retrieve the relevant model to the appropriate weights. Here it will create an instance of DeiTForImageClassification. This can also be extended into tokenizers and feature extractors:
feature_extractor = AutoFeatureExtractor.from_pretrained( 'facebook/deit-base-distilled-patch16-224' )
That concludes our tutorial on Vision Transformers and Hugging Face. By the way, you can find the entire code in our Github repository.
For a more complete introduction to Hugging Face, check out the Natural Language Processing with Transformers: Building Language Applications with Hugging Face book by 3 HF engineers
Acknowledgements
A big shout out to Niels Rogge and his amazing tutorials on Transformers. The code presented in this article is heavily inspired by it and modified to suit our needs. He also deserves many thanks for being the main contributor to add the Vision Transformer (ViT) and Data-efficient Image Transformers (DeiT) to the Hugging Face library.
Conclusion
The Hugging Face team has done a great job in enhancing AI research. We’re super glad that this endeavor is slowly expanding into vision as well. Looking forward to seeing more models and datasets in their hub.
Let us know if you find the article useful on our Discord server. See you next week.

* Disclosure: Please note that some of the links above might be affiliate links, and at no additional cost to you, we will earn a commission if you decide to make a purchase after clicking through.